LangSmith를 사용하면 이미지, 오디오 파일 또는 문서와 같은 파일 첨부가 포함된 dataset example을 생성할 수 있으므로, 멀티모달 입력 또는 출력을 사용하는 애플리케이션을 평가할 때 이를 참조할 수 있습니다.
base64 인코딩을 통해 example에 멀티모달 데이터를 포함할 수 있지만, 이 방식은 비효율적입니다. 인코딩된 데이터는 원본 바이너리 파일보다 더 많은 공간을 차지하여 LangSmith와의 전송 속도가 느려집니다. 대신 첨부 파일을 사용하면 두 가지 주요 이점이 있습니다:
- 더 효율적인 바이너리 파일 전송으로 인한 빠른 업로드 및 다운로드 속도
- LangSmith UI에서 다양한 파일 유형의 향상된 시각화
SDK
1. 첨부 파일이 있는 example 생성하기
SDK를 사용하여 첨부 파일이 있는 example을 업로드하려면 create_examples / update_examples Python 메서드 또는 uploadExamplesMultipart / updateExamplesMultipart TypeScript 메서드를 사용하세요.
Python
langsmith>=0.3.13 필요
import requests
import uuid
from pathlib import Path
from langsmith import Client

# Publicly available test files
pdf_url = "https://www.w3.org/WAI/ER/tests/xhtml/testfiles/resources/pdf/dummy.pdf"
wav_url = "https://openaiassets.blob.core.windows.net/$web/API/docs/audio/alloy.wav"
img_url = "https://www.w3.org/Graphics/PNG/nurbcup2si.png"

# Fetch the files as bytes
pdf_bytes = requests.get(pdf_url).content
wav_bytes = requests.get(wav_url).content
img_bytes = requests.get(img_url).content

# Create the dataset
ls_client = Client()
dataset_name = "attachment-test-dataset"
dataset = ls_client.create_dataset(
  dataset_name=dataset_name,
  description="Test dataset for evals with publicly available attachments",
)

inputs = {
  "audio_question": "What is in this audio clip?",
  "image_question": "What is in this image?",
}

outputs = {
  "audio_answer": "The sun rises in the east and sets in the west. This simple fact has been observed by humans for thousands of years.",
  "image_answer": "A mug with a blanket over it.",
}

# Define an example with attachments
example_id = uuid.uuid4()
example = {
  "id": example_id,
  "inputs": inputs,
  "outputs": outputs,
  "attachments": {
      "my_pdf": {"mime_type": "application/pdf", "data": pdf_bytes},
      "my_wav": {"mime_type": "audio/wav", "data": wav_bytes},
      "my_img": {"mime_type": "image/png", "data": img_bytes},
      # Example of an attachment specified via a local file path:
      # "my_local_img": {"mime_type": "image/png", "data": Path(__file__).parent / "my_local_img.png"},
  },
}

# Create the example
ls_client.create_examples(
  dataset_id=dataset.id,
  examples=[example],
  # Uncomment this flag if you'd like to upload attachments from local files:
  # dangerously_allow_filesystem=True
)
TypeScript
버전 >= 0.2.13 필요
uploadExamplesMultipart 메서드를 사용하여 첨부 파일이 있는 example을 업로드할 수 있습니다.
이는 현재 첨부 파일을 지원하지 않는 표준 createExamples 메서드와는 다른 메서드입니다. 각 첨부 파일은 데이터 타입으로 Uint8Array 또는 ArrayBuffer가 필요합니다.
Uint8Array: 바이너리 데이터를 직접 처리하는 데 유용합니다.ArrayBuffer: 고정 길이 바이너리 데이터를 나타내며, 필요에 따라 Uint8Array로 변환할 수 있습니다.
TypeScript SDK에서는 모든 런타임 환경에서 로컬 파일 액세스가 지원되지 않으므로 파일 경로를 직접 전달할 수 없습니다.
import { Client } from "langsmith";
import { v4 as uuid4 } from "uuid";

// Publicly available test files
const pdfUrl = "https://www.w3.org/WAI/ER/tests/xhtml/testfiles/resources/pdf/dummy.pdf";
const wavUrl = "https://openaiassets.blob.core.windows.net/$web/API/docs/audio/alloy.wav";
const pngUrl = "https://www.w3.org/Graphics/PNG/nurbcup2si.png";

// Helper function to fetch file as ArrayBuffer
async function fetchArrayBuffer(url: string): Promise<ArrayBuffer> {
  const response = await fetch(url);
  if (!response.ok) {
    throw new Error(`Failed to fetch ${url}: ${response.statusText}`);
  }
  return response.arrayBuffer();
}

// Fetch files as ArrayBuffer
const pdfArrayBuffer = await fetchArrayBuffer(pdfUrl);
const wavArrayBuffer = await fetchArrayBuffer(wavUrl);
const pngArrayBuffer = await fetchArrayBuffer(pngUrl);

// Create the LangSmith client (Ensure LANGSMITH_API_KEY is set in env)
const langsmithClient = new Client();

// Create a unique dataset name
const datasetName = "attachment-test-dataset:" + uuid4().substring(0, 8);

// Create the dataset
const dataset = await langsmithClient.createDataset(datasetName, {
  description: "Test dataset for evals with publicly available attachments",
});

// Define the example with attachments
const exampleId = uuid4();
const example = {
  id: exampleId,
  inputs: {
      audio_question: "What is in this audio clip?",
      image_question: "What is in this image?",
  },
  outputs: {
      audio_answer: "The sun rises in the east and sets in the west. This simple fact has been observed by humans for thousands of years.",
      image_answer: "A mug with a blanket over it.",
  },
  attachments: {
    my_pdf: {
      mimeType: "application/pdf",
      data: pdfArrayBuffer
    },
    my_wav: {
      mimeType: "audio/wav",
      data: wavArrayBuffer
    },
    my_img: {
      mimeType: "image/png",
      data: pngArrayBuffer
    },
  },
};

// Upload the example with attachments to the dataset
await langsmithClient.uploadExamplesMultipart(dataset.id, [example]);
바이트로 전달되는 것 외에도, 첨부 파일은 로컬 파일 경로로 지정할 수 있습니다. 이렇게 하려면 첨부 파일 data 값에 경로를 전달하고 dangerously_allow_filesystem=True 인수를 지정하세요:client.create_examples(..., dangerously_allow_filesystem=True)
2. 평가 실행하기
target function 정의하기
이제 첨부 파일이 포함된 example이 있는 dataset이 있으므로, 이러한 example에 대해 실행할 target function을 정의할 수 있습니다. 다음 예제는 단순히 OpenAI의 GPT-4o 모델을 사용하여 이미지와 오디오 클립에 대한 질문에 답변합니다.
Python
평가하려는 target function은 example과 연결된 첨부 파일을 사용하기 위해 두 개의 위치 인수를 가져야 하며, 첫 번째는 inputs라고 하고 두 번째는 attachments라고 해야 합니다.
inputs 인수는 첨부 파일을 제외한 example의 입력 데이터를 포함하는 dictionary입니다.attachments 인수는 첨부 파일 이름을 presigned url, mime_type 및 파일의 바이트 콘텐츠 reader를 포함하는 dictionary에 매핑하는 dictionary입니다. presigned url 또는 reader를 사용하여 파일 콘텐츠를 가져올 수 있습니다. attachments dictionary의 각 값은 다음 구조를 가진 dictionary입니다:
{
    "presigned_url": str,
    "mime_type": str,
    "reader": BinaryIO
}
from langsmith.wrappers import wrap_openai
import base64
from openai import OpenAI

client = wrap_openai(OpenAI())

# Define target function that uses attachments
def file_qa(inputs, attachments):
    # Read the audio bytes from the reader and encode them in base64
    audio_reader = attachments["my_wav"]["reader"]
    audio_b64 = base64.b64encode(audio_reader.read()).decode('utf-8')

    audio_completion = client.chat.completions.create(
        model="gpt-4o-audio-preview",
        messages=[
            {
                "role": "user",
                "content": [
                    {
                        "type": "text",
                        "text": inputs["audio_question"]
                    },
                    {
                        "type": "input_audio",
                        "input_audio": {
                            "data": audio_b64,
                            "format": "wav"
                        }
                    }
                ]
            }
        ]
    )

    # Most models support taking in an image URL directly in addition to base64 encoded images
    # You can pipe the image pre-signed URL directly to the model
    image_url = attachments["my_img"]["presigned_url"]
    image_completion = client.chat.completions.create(
        model="gpt-4o-mini",
        messages=[
          {
            "role": "user",
            "content": [
              {"type": "text", "text": inputs["image_question"]},
              {
                "type": "image_url",
                "image_url": {
                  "url": image_url,
                },
              },
            ],
          }
        ],
    )

    return {
        "audio_answer": audio_completion.choices[0].message.content,
        "image_answer": image_completion.choices[0].message.content,
    }
TypeScript
TypeScript SDK에서는 includeAttachments가 true로 설정된 경우 config 인수를 사용하여 첨부 파일을 target function에 전달합니다.
config에는 첨부 파일 이름을 다음 형식의 객체에 매핑하는 attachments가 포함됩니다:
{
  presigned_url: string,
  mime_type: string,
}
import OpenAI from "openai";
import { wrapOpenAI } from "langsmith/wrappers";

const client: any = wrapOpenAI(new OpenAI());

async function fileQA(inputs: Record<string, any>, config?: Record<string, any>) {
  const presignedUrl = config?.attachments?.["my_wav"]?.presigned_url;
  if (!presignedUrl) {
    throw new Error("No presigned URL provided for audio.");
  }

  const response = await fetch(presignedUrl);
  if (!response.ok) {
    throw new Error(`Failed to fetch audio: ${response.statusText}`);
  }

  const arrayBuffer = await response.arrayBuffer();
  const uint8Array = new Uint8Array(arrayBuffer);
  const audioB64 = Buffer.from(uint8Array).toString("base64");

  const audioCompletion = await client.chat.completions.create({
    model: "gpt-4o-audio-preview",
    messages: [
      {
        role: "user",
        content: [
          { type: "text", text: inputs["audio_question"] },
          {
            type: "input_audio",
            input_audio: {
              data: audioB64,
              format: "wav",
            },
          },
        ],
      },
    ],
  });

  const imageUrl = config?.attachments?.["my_img"]?.presigned_url
  const imageCompletion = await client.chat.completions.create({
    model: "gpt-4o-mini",
    messages: [
      {
        role: "user",
        content: [
          { type: "text", text: inputs["image_question"] },
          {
            type: "image_url",
            image_url: {
              url: imageUrl,
            },
          },
        ],
      },
    ],
  });

  return {
    audio_answer: audioCompletion.choices[0].message.content,
    image_answer: imageCompletion.choices[0].message.content,
  };
}
custom evaluator 정의하기
evaluator가 첨부 파일을 받아야 하는지 여부를 결정하는 데 위와 동일한 규칙이 적용됩니다.
아래 evaluator는 LLM을 사용하여 추론과 답변이 일치하는지 판단합니다. LLM 기반 evaluator를 정의하는 방법에 대해 자세히 알아보려면 이 가이드를 참조하세요.
# Assumes you've installed pydantic
from pydantic import BaseModel

def valid_image_description(outputs: dict, attachments: dict) -> bool:
  """Use an LLM to judge if the image description and images are consistent."""
  instructions = """
  Does the description of the following image make sense?
  Please carefully review the image and the description to determine if the description is valid.
  """

  class Response(BaseModel):
      description_is_valid: bool

  image_url = attachments["my_img"]["presigned_url"]
  response = client.beta.chat.completions.parse(
      model="gpt-4o",
      messages=[
          {
              "role": "system",
              "content": instructions
          },
          {
              "role": "user",
              "content": [
                  {"type": "image_url", "image_url": {"url": image_url}},
                  {"type": "text", "text": outputs["image_answer"]}
              ]
          }
      ],
      response_format=Response
  )
  return response.choices[0].message.parsed.description_is_valid

ls_client.evaluate(
  file_qa,
  data=dataset_name,
  evaluators=[valid_image_description],
)
첨부 파일이 있는 example 업데이트하기
위의 코드에서 첨부 파일이 있는 example을 dataset에 추가하는 방법을 보여주었습니다. SDK를 사용하여 동일한 example을 업데이트하는 것도 가능합니다.
기존 example과 마찬가지로, 첨부 파일로 업데이트할 때 dataset의 버전이 관리됩니다. 따라서 dataset 버전 기록으로 이동하여 각 example에 대한 변경 사항을 확인할 수 있습니다. 자세한 내용은 이 가이드를 참조하세요.
첨부 파일이 있는 example을 업데이트할 때 몇 가지 방법으로 첨부 파일을 업데이트할 수 있습니다:
- 새 첨부 파일 전달
- 기존 첨부 파일 이름 변경
- 기존 첨부 파일 삭제
참고 사항:
- 명시적으로 이름이 변경되거나 유지되지 않은 기존 첨부 파일은 삭제됩니다.
retain 또는 rename에 존재하지 않는 첨부 파일 이름을 전달하면 오류가 발생합니다.- 동일한 첨부 파일 이름이
attachments 및 attachment_operations 필드에 나타나는 경우 새 첨부 파일이 기존 첨부 파일보다 우선합니다.
example_update = {
  "id": example_id,
  "attachments": {
      # These are net new attachments
      "my_new_file": ("text/plain", b"foo bar"),
  },
  "inputs": inputs,
  "outputs": outputs,
  # Any attachments not in rename/retain will be deleted.
  # In this case, that would be "my_img" if we uploaded it.
  "attachments_operations": {
      # Retained attachments will stay exactly the same
      "retain": ["my_pdf"],
      # Renaming attachments preserves the original data
      "rename": {
          "my_wav": "my_new_wav",
      }
  },
}

ls_client.update_examples(dataset_id=dataset.id, updates=[example_update])
1. 첨부 파일이 있는 example 생성하기
몇 가지 방법으로 첨부 파일이 있는 example을 dataset에 추가할 수 있습니다.
기존 run에서
LangSmith dataset에 run을 추가할 때, 소스 run에서 대상 example로 첨부 파일을 선택적으로 전파할 수 있습니다. 자세한 내용은 이 가이드를 참조하세요.
처음부터
LangSmith UI에서 직접 첨부 파일이 있는 example을 생성할 수 있습니다. dataset UI의 Examples 탭에서 + Example 버튼을 클릭하세요. 그런 다음 “Upload Files” 버튼을 사용하여 첨부 파일을 업로드하세요:
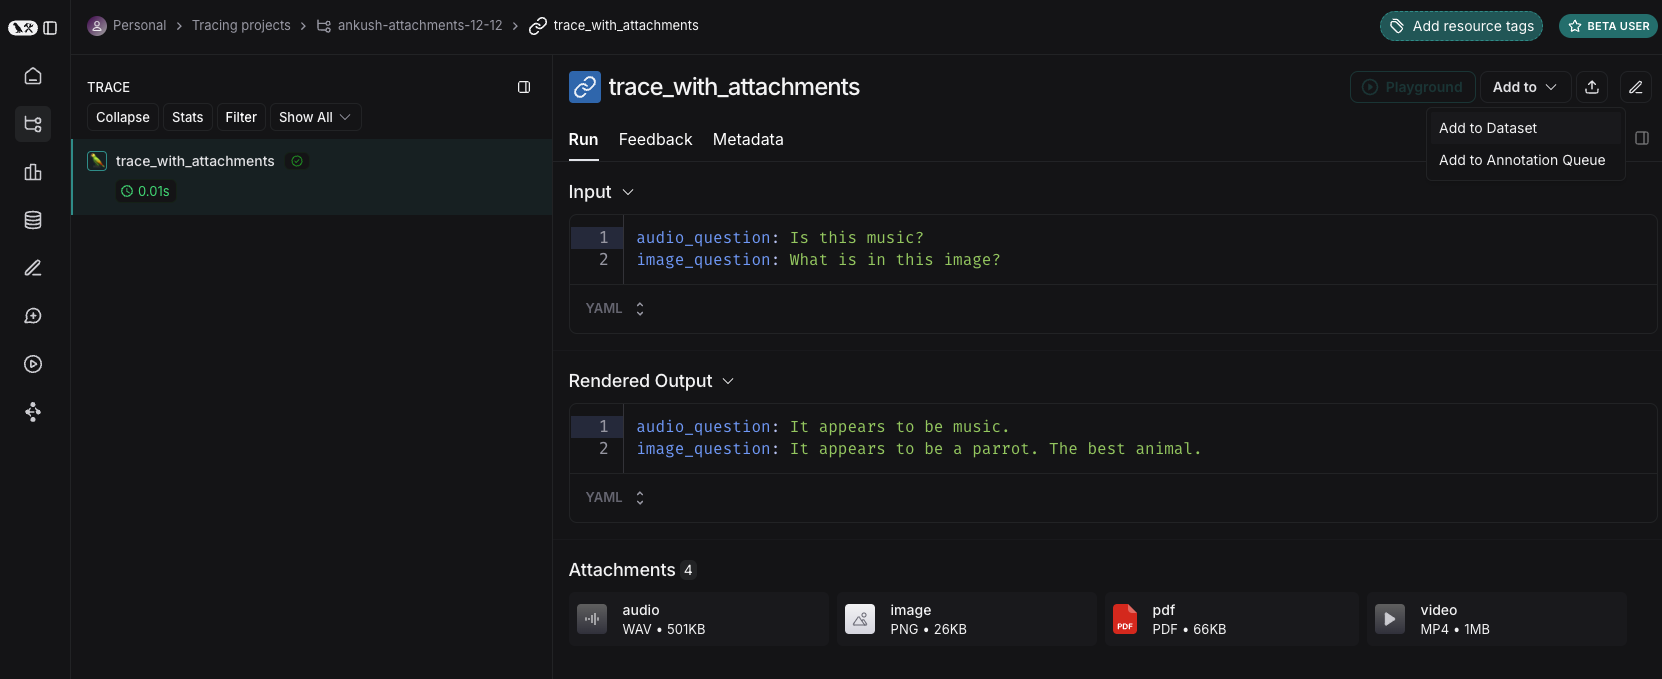
 업로드되면 LangSmith UI에서 첨부 파일이 있는 example을 볼 수 있습니다. 각 첨부 파일은 쉽게 검사할 수 있도록 미리보기와 함께 렌더링됩니다.
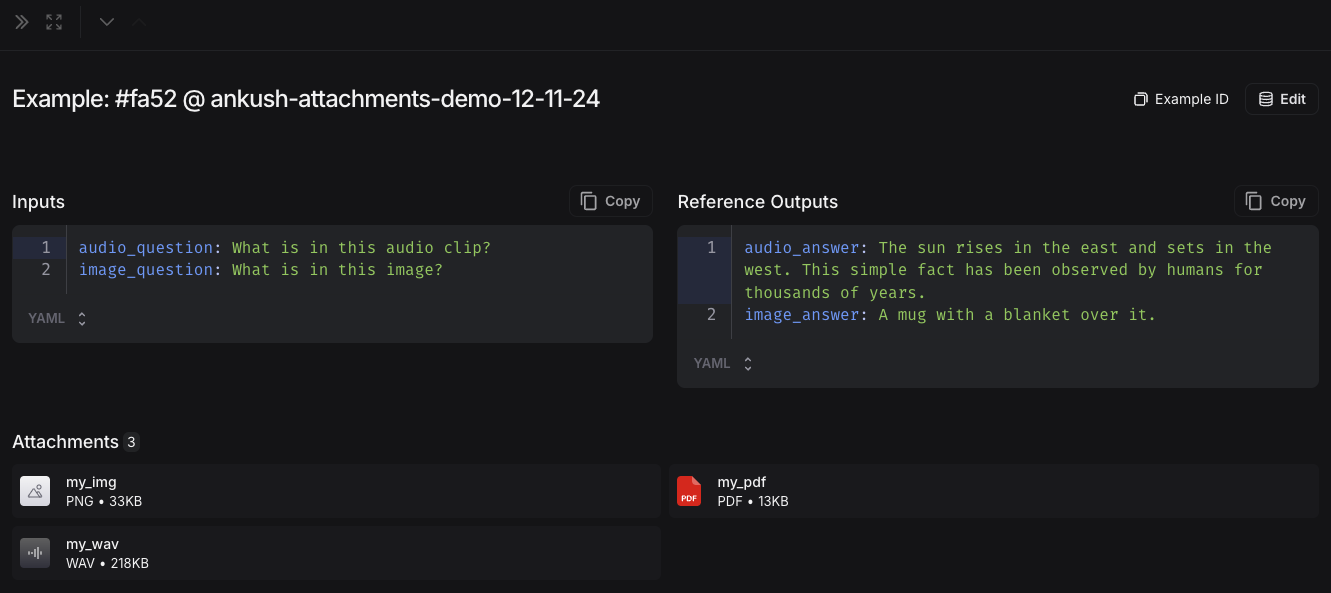
2. 멀티모달 prompt 생성하기
LangSmith UI를 사용하면 멀티모달 모델을 평가할 때 prompt에 첨부 파일을 포함할 수 있습니다:
먼저, 멀티모달 콘텐츠를 추가하려는 메시지에서 파일 아이콘을 클릭하세요. 다음으로, 각 example에 포함하려는 첨부 파일에 대한 template variable을 추가하세요.
- 단일 첨부 파일 유형의 경우: 제안된 변수 이름을 사용하세요. 참고: 모든 example에 이 이름의 첨부 파일이 있어야 합니다.
- 여러 첨부 파일이 있거나 example마다 첨부 파일 이름이 다른 경우:
All attachments 변수를 사용하여 각 example에 사용 가능한 모든 첨부 파일을 포함하세요.

custom evaluator 정의하기
LangSmith playground는 현재 evaluator로 멀티모달 콘텐츠를 가져오는 것을 지원하지 않습니다. 이것이 귀하의 사용 사례에 도움이 된다면 LangChain Forum에 알려주세요 (아직 회원이 아니라면 여기에서 가입하세요)!
- OCR → 텍스트 수정: vision 모델을 사용하여 문서에서 텍스트를 추출한 다음 추출된 출력의 정확도를 평가합니다.
- Speech-to-text → 전사 품질: voice 모델을 사용하여 오디오를 텍스트로 전사한 다음 참조와 비교하여 전사를 평가합니다.
custom evaluator 정의에 대한 자세한 내용은 LLM as Judge 가이드를 참조하세요.
첨부 파일이 있는 example 업데이트하기
UI에서 첨부 파일은 크기가 20MB로 제한됩니다.
- 새 첨부 파일 업로드
- 첨부 파일 이름 변경 및 삭제
- 빠른 재설정 버튼을 사용하여 첨부 파일을 이전 상태로 재설정
변경 사항은 제출을 클릭할 때까지 저장되지 않습니다.