이 내용을 살펴보기 전에 다음 가이드를 읽어보시면 도움이 됩니다:
다음 기능은 아래 SDK 버전에서 사용할 수 있습니다:
  • Python SDK: >=0.1.141
  • JS/TS SDK: >=0.2.5
LangSmith는 trace와 함께 바이너리 파일(이미지, 오디오, 비디오, PDF, CSV 등)을 업로드하는 것을 지원합니다. 이는 multimodal 입력 또는 출력을 사용하는 LLM 파이프라인 작업 시 특히 유용합니다. Python과 TypeScript SDK 모두에서 각 파일의 MIME type과 바이너리 콘텐츠를 지정하여 trace에 첨부 파일을 추가할 수 있습니다. 이 가이드는 Python의 
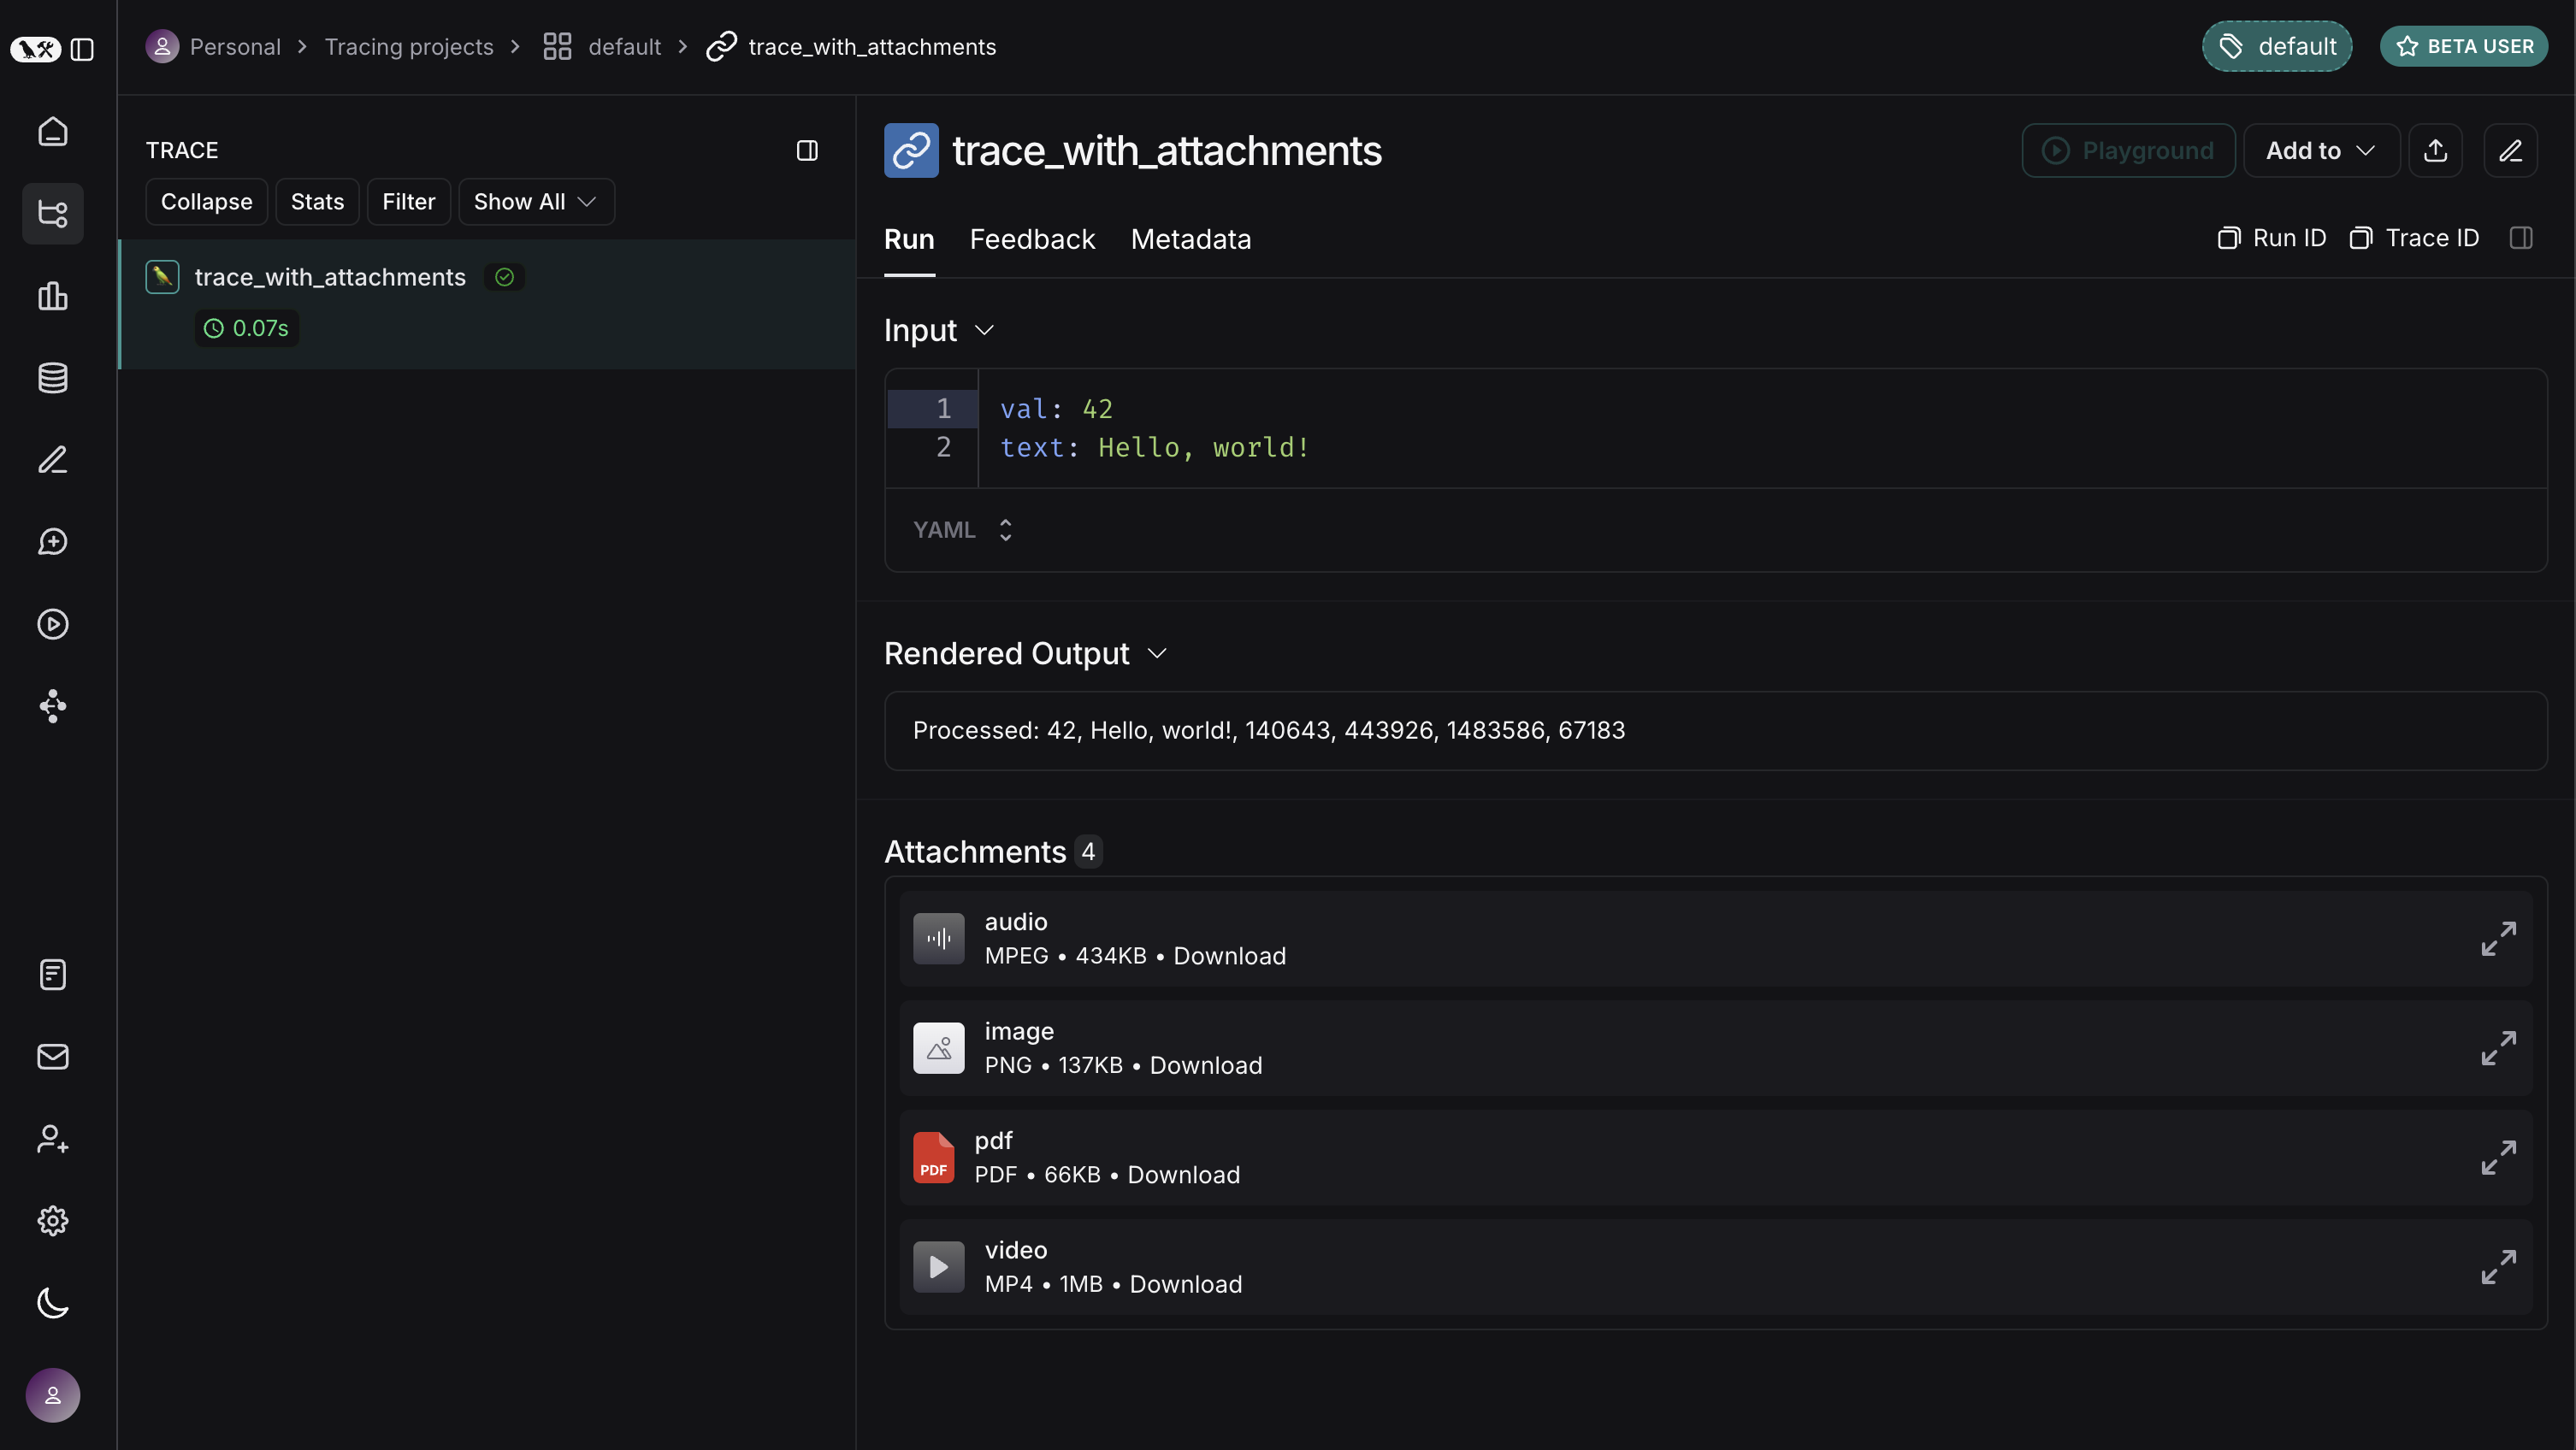
Attachment type과 TypeScript의 Uint8Array / ArrayBuffer를 사용하여 첨부 파일을 정의하고 trace하는 방법을 설명합니다.

Python

Python SDK에서는 Attachment type을 사용하여 trace에 파일을 추가할 수 있습니다. 각 Attachment는 다음을 필요로 합니다:
  • mime_type (str): 파일의 MIME type (예: "image/png").
  • data (bytes | Path): 파일의 바이너리 콘텐츠 또는 파일 경로.
편의를 위해 (mime_type, data) 형태의 tuple로 첨부 파일을 정의할 수도 있습니다. 함수를 @traceable로 데코레이트하고 Attachment 인스턴스를 인자로 포함하기만 하면 됩니다. 원시 바이트 대신 파일 경로를 사용하려면 traceable decorator에서 dangerously_allow_filesystem 플래그를 True로 설정해야 합니다.
Python
from langsmith import traceable
from langsmith.schemas import Attachment
from pathlib import Path
import os

# Must set dangerously_allow_filesystem to True if you want to use file paths
@traceable(dangerously_allow_filesystem=True)
def trace_with_attachments(
    val: int,
    text: str,
    image: Attachment,
    audio: Attachment,
    video: Attachment,
    pdf: Attachment,
    csv: Attachment,
):
    return f"Processed: {val}, {text}, {len(image.data)}, {len(audio.data)}, {len(video.data)}, {len(pdf.data), {len(csv.data)}}"

# Helper function to load files as bytes
def load_file(file_path: str) -> bytes:
    with open(file_path, "rb") as f:
        return f.read()

# Load files and create attachments
image_data = load_file("my_image.png")
audio_data = load_file("my_mp3.mp3")
video_data = load_file("my_video.mp4")
pdf_data = load_file("my_document.pdf")

image_attachment = Attachment(mime_type="image/png", data=image_data)
audio_attachment = Attachment(mime_type="audio/mpeg", data=audio_data)
video_attachment = Attachment(mime_type="video/mp4", data=video_data)
pdf_attachment = ("application/pdf", pdf_data) # Can just define as tuple of (mime_type, data)
csv_attachment = Attachment(mime_type="text/csv", data=Path(os.getcwd()) / "my_csv.csv")

# Define other parameters
val = 42
text = "Hello, world!"

# Call the function with traced attachments
result = trace_with_attachments(
    val=val,
    text=text,
    image=image_attachment,
    audio=audio_attachment,
    video=video_attachment,
    pdf=pdf_attachment,
    csv=csv_attachment,
)

TypeScript

TypeScript SDK에서는 Uint8Array 또는 ArrayBuffer를 데이터 타입으로 사용하여 trace에 첨부 파일을 추가할 수 있습니다. 각 첨부 파일의 MIME type은 extractAttachments 내에서 지정됩니다:
  • Uint8Array: 바이너리 데이터를 직접 처리하는 데 유용합니다.
  • ArrayBuffer: 고정 길이 바이너리 데이터를 나타내며, 필요에 따라 Uint8Array로 변환할 수 있습니다.
함수를 traceable로 래핑하고 extractAttachments 옵션 내에 첨부 파일을 포함하세요. TypeScript SDK에서 extractAttachments 함수는 traceable 구성의 선택적 매개변수입니다. traceable로 래핑된 함수가 호출되면, 입력에서 바이너리 데이터(예: 이미지, 오디오 파일)를 추출하고 MIME type을 지정하여 다른 trace 데이터와 함께 기록합니다. TypeScript SDK에서는 모든 런타임 환경에서 로컬 파일 접근이 지원되지 않으므로 파일 경로를 직접 전달할 수 없습니다.
TypeScript
type AttachmentData = Uint8Array | ArrayBuffer;
type Attachments = Record<string, [string, AttachmentData]>;

extractAttachments?: (
    ...args: Parameters<Func>
) => [Attachments | undefined, KVMap];
TypeScript
import { traceable } from "langsmith/traceable";

const traceableWithAttachments = traceable(
    (
        val: number,
        text: string,
        attachment: Uint8Array,
        attachment2: ArrayBuffer,
        attachment3: Uint8Array,
        attachment4: ArrayBuffer,
        attachment5: Uint8Array,
    ) =>
        `Processed: ${val}, ${text}, ${attachment.length}, ${attachment2.byteLength}, ${attachment3.length}, ${attachment4.byteLength}, ${attachment5.byteLength}`,
    {
        name: "traceWithAttachments",
        extractAttachments: (
            val: number,
            text: string,
            attachment: Uint8Array,
            attachment2: ArrayBuffer,
            attachment3: Uint8Array,
            attachment4: ArrayBuffer,
            attachment5: Uint8Array,
        ) => [
            {
                "image inputs": ["image/png", attachment],
                "mp3 inputs": ["audio/mpeg", new Uint8Array(attachment2)],
                "video inputs": ["video/mp4", attachment3],
                "pdf inputs": ["application/pdf", new Uint8Array(attachment4)],
                "csv inputs": ["text/csv", new Uint8Array(attachment5)],
            },
            { val, text },
        ],
    }
);

const fs = Deno // or Node.js fs module
const image = await fs.readFile("my_image.png"); // Uint8Array
const mp3Buffer = await fs.readFile("my_mp3.mp3");
const mp3ArrayBuffer = mp3Buffer.buffer; // Convert to ArrayBuffer
const video = await fs.readFile("my_video.mp4"); // Uint8Array
const pdfBuffer = await fs.readFile("my_document.pdf");
const pdfArrayBuffer = pdfBuffer.buffer; // Convert to ArrayBuffer
const csv = await fs.readFile("test-vals.csv"); // Uint8Array

// Define example parameters
const val = 42;
const text = "Hello, world!";

// Call traceableWithAttachments with the files
const result = await traceableWithAttachments(
    val, text, image, mp3ArrayBuffer, video, pdfArrayBuffer, csv
);
다음은 위 내용이 LangSmith UI에서 어떻게 보이는지 보여줍니다. 각 첨부 파일을 확장하여 내용을 볼 수 있습니다.
Connect these docs programmatically to Claude, VSCode, and more via MCP for real-time answers.
I