이 가이드는 LangGraph의 Graph API 기본 사항을 설명합니다. state와 시퀀스, 분기, 루프와 같은 일반적인 그래프 구조를 구성하는 방법을 안내합니다. 또한 map-reduce 워크플로우를 위한 Send API와 노드 간 “홉”과 상태 업데이트를 결합하는 Command API를 포함한 LangGraph의 제어 기능도 다룹니다.
더 나은 디버깅을 위해 LangSmith 설정하기LangSmith에 가입하여 LangGraph 프로젝트의 문제를 빠르게 발견하고 성능을 개선하세요. LangSmith를 사용하면 trace 데이터를 활용하여 LangGraph로 구축된 LLM 앱을 디버그, 테스트 및 모니터링할 수 있습니다 — 시작하는 방법에 대한 자세한 내용은 문서를 참조하세요.
LangGraph의 State는 TypedDict, Pydantic 모델 또는 dataclass가 될 수 있습니다. 아래에서는 TypedDict를 사용합니다. Pydantic 사용에 대한 자세한 내용은 이 섹션을 참조하세요.기본적으로 그래프는 동일한 입력 및 출력 스키마를 가지며, state가 해당 스키마를 결정합니다. 별도의 입력 및 출력 스키마를 정의하는 방법은 이 섹션을 참조하세요.messages를 사용하는 간단한 예제를 살펴보겠습니다. 이는 많은 LLM 애플리케이션에 대한 다재다능한 state 형식을 나타냅니다. 자세한 내용은 개념 페이지를 참조하세요.
Copy
from langchain.messages import AnyMessagefrom typing_extensions import TypedDictclass State(TypedDict): messages: list[AnyMessage] extra_field: int
for message in result["messages"]:
    message.pretty_print()
Copy
================================ Human Message ================================Hi================================== Ai Message ==================================Hello!
state의 각 키는 자체적인 독립적인 reducer 함수를 가질 수 있으며, 이는 노드의 업데이트가 적용되는 방식을 제어합니다. reducer 함수가 명시적으로 지정되지 않으면 키에 대한 모든 업데이트가 이를 덮어쓴다고 가정합니다.TypedDict state 스키마의 경우, state의 해당 필드에 reducer 함수로 주석을 달아 reducer를 정의할 수 있습니다.이전 예제에서 노드는 메시지를 추가하여 state의 "messages" 키를 업데이트했습니다. 아래에서는 이 키에 reducer를 추가하여 업데이트가 자동으로 추가되도록 합니다:
Copy
from typing_extensions import Annotateddef add(left, right): """Can also import `add` from the `operator` built-in.""" return left + rightclass State(TypedDict): messages: Annotated[list[AnyMessage], add] extra_field: int
from langgraph.graph import STARTgraph = StateGraph(State).add_node(node).add_edge(START, "node").compile()result = graph.invoke({"messages": [HumanMessage("Hi")]})for message in result["messages"]: message.pretty_print()
Copy
================================ Human Message ================================Hi================================== Ai Message ==================================Hello!
input_message = {"role": "user", "content": "Hi"} result = graph.invoke({"messages": [input_message]})for message in result["messages"]: message.pretty_print()
Copy
================================ Human Message ================================Hi================================== Ai Message ==================================Hello!
이것은 chat models를 포함하는 애플리케이션에 대한 다재다능한 state 표현입니다. LangGraph는 편의를 위해 사전 구축된 MessagesState를 포함하므로 다음과 같이 사용할 수 있습니다:
Copy
from langgraph.graph import MessagesStateclass State(MessagesState): extra_field: int
기본적으로 StateGraph는 단일 스키마로 작동하며 모든 노드는 해당 스키마를 사용하여 통신할 것으로 예상됩니다. 그러나 그래프에 대해 별도의 입력 및 출력 스키마를 정의하는 것도 가능합니다.별도의 스키마가 지정되면 노드 간 통신에는 여전히 내부 스키마가 사용됩니다. 입력 스키마는 제공된 입력이 예상 구조와 일치하는지 확인하고, 출력 스키마는 정의된 출력 스키마에 따라 관련 정보만 반환하도록 내부 데이터를 필터링합니다.아래에서는 별도의 입력 및 출력 스키마를 정의하는 방법을 살펴보겠습니다.
Copy
from langgraph.graph import StateGraph, START, ENDfrom typing_extensions import TypedDict# Define the schema for the inputclass InputState(TypedDict): question: str# Define the schema for the outputclass OutputState(TypedDict): answer: str# Define the overall schema, combining both input and outputclass OverallState(InputState, OutputState): pass# Define the node that processes the input and generates an answerdef answer_node(state: InputState): # Example answer and an extra key return {"answer": "bye", "question": state["question"]}# Build the graph with input and output schemas specifiedbuilder = StateGraph(OverallState, input_schema=InputState, output_schema=OutputState)builder.add_node(answer_node) # Add the answer nodebuilder.add_edge(START, "answer_node") # Define the starting edgebuilder.add_edge("answer_node", END) # Define the ending edgegraph = builder.compile() # Compile the graph# Invoke the graph with an input and print the resultprint(graph.invoke({"question": "hi"}))
경우에 따라 노드가 중간 로직에 중요하지만 그래프의 주요 스키마의 일부일 필요가 없는 정보를 교환하기를 원할 수 있습니다. 이 비공개 데이터는 그래프의 전체 입력/출력과 관련이 없으며 특정 노드 간에만 공유되어야 합니다.아래에서는 세 개의 노드(node_1, node_2 및 node_3)로 구성된 예제 순차 그래프를 만들 것입니다. 여기서 비공개 데이터는 처음 두 단계(node_1 및 node_2) 간에 전달되고, 세 번째 단계(node_3)는 공개 전체 state에만 액세스할 수 있습니다.
Copy
from langgraph.graph import StateGraph, START, ENDfrom typing_extensions import TypedDict# The overall state of the graph (this is the public state shared across nodes)class OverallState(TypedDict): a: str# Output from node_1 contains private data that is not part of the overall stateclass Node1Output(TypedDict): private_data: str# The private data is only shared between node_1 and node_2def node_1(state: OverallState) -> Node1Output: output = {"private_data": "set by node_1"} print(f"Entered node `node_1`:\n\tInput: {state}.\n\tReturned: {output}") return output# Node 2 input only requests the private data available after node_1class Node2Input(TypedDict): private_data: strdef node_2(state: Node2Input) -> OverallState: output = {"a": "set by node_2"} print(f"Entered node `node_2`:\n\tInput: {state}.\n\tReturned: {output}") return output# Node 3 only has access to the overall state (no access to private data from node_1)def node_3(state: OverallState) -> OverallState: output = {"a": "set by node_3"} print(f"Entered node `node_3`:\n\tInput: {state}.\n\tReturned: {output}") return output# Connect nodes in a sequence# node_2 accepts private data from node_1, whereas# node_3 does not see the private data.builder = StateGraph(OverallState).add_sequence([node_1, node_2, node_3])builder.add_edge(START, "node_1")graph = builder.compile()# Invoke the graph with the initial stateresponse = graph.invoke( { "a": "set at start", })print()print(f"Output of graph invocation: {response}")
Copy
Entered node `node_1`: ut: {'a': 'set at start'}. urned: {'private_data': 'set by node_1'}Entered node `node_2`: ut: {'private_data': 'set by node_1'}. urned: {'a': 'set by node_2'}Entered node `node_3`: ut: {'a': 'set by node_2'}. urned: {'a': 'set by node_3'}Output of graph invocation: {'a': 'set by node_3'}
Pydantic의 재귀 검증은 느릴 수 있습니다. 성능에 민감한 애플리케이션의 경우 dataclass를 사용하는 것을 고려할 수 있습니다.
Copy
from langgraph.graph import StateGraph, START, ENDfrom typing_extensions import TypedDictfrom pydantic import BaseModel# The overall state of the graph (this is the public state shared across nodes)class OverallState(BaseModel): a: strdef node(state: OverallState): return {"a": "goodbye"}# Build the state graphbuilder = StateGraph(OverallState)builder.add_node(node) # node_1 is the first nodebuilder.add_edge(START, "node") # Start the graph with node_1builder.add_edge("node", END) # End the graph after node_1graph = builder.compile()# Test the graph with a valid inputgraph.invoke({"a": "hello"})
유효하지 않은 입력으로 그래프 호출
Copy
try: graph.invoke({"a": 123}) # Should be a stringexcept Exception as e: print("An exception was raised because `a` is an integer rather than a string.") print(e)
Copy
An exception was raised because `a` is an integer rather than a string.1 validation error for OverallStatea Input should be a valid string [type=string_type, input_value=123, input_type=int] For further information visit https://errors.pydantic.dev/2.9/v/string_type
Pydantic 모델 state의 추가 기능은 아래를 참조하세요:
직렬화 동작
Pydantic 모델을 state 스키마로 사용할 때 특히 다음과 같은 경우 직렬화가 어떻게 작동하는지 이해하는 것이 중요합니다:
Pydantic 객체를 입력으로 전달
그래프에서 출력 받기
중첩된 Pydantic 모델 작업
이러한 동작을 실제로 살펴보겠습니다.
Copy
from langgraph.graph import StateGraph, START, ENDfrom pydantic import BaseModelclass NestedModel(BaseModel): value: strclass ComplexState(BaseModel): text: str count: int nested: NestedModeldef process_node(state: ComplexState): # Node receives a validated Pydantic object print(f"Input state type: {type(state)}") print(f"Nested type: {type(state.nested)}") # Return a dictionary update return {"text": state.text + " processed", "count": state.count + 1}# Build the graphbuilder = StateGraph(ComplexState)builder.add_node("process", process_node)builder.add_edge(START, "process")builder.add_edge("process", END)graph = builder.compile()# Create a Pydantic instance for inputinput_state = ComplexState(text="hello", count=0, nested=NestedModel(value="test"))print(f"Input object type: {type(input_state)}")# Invoke graph with a Pydantic instanceresult = graph.invoke(input_state)print(f"Output type: {type(result)}")print(f"Output content: {result}")# Convert back to Pydantic model if neededoutput_model = ComplexState(**result)print(f"Converted back to Pydantic: {type(output_model)}")
런타임 타입 강제 변환
Pydantic은 특정 데이터 타입에 대해 런타임 타입 강제 변환을 수행합니다. 이는 도움이 될 수 있지만 인식하지 못하면 예상치 못한 동작으로 이어질 수 있습니다.
Copy
from langgraph.graph import StateGraph, START, ENDfrom pydantic import BaseModelclass CoercionExample(BaseModel): # Pydantic will coerce string numbers to integers number: int # Pydantic will parse string booleans to bool flag: booldef inspect_node(state: CoercionExample): print(f"number: {state.number} (type: {type(state.number)})") print(f"flag: {state.flag} (type: {type(state.flag)})") return {}builder = StateGraph(CoercionExample)builder.add_node("inspect", inspect_node)builder.add_edge(START, "inspect")builder.add_edge("inspect", END)graph = builder.compile()# Demonstrate coercion with string inputs that will be convertedresult = graph.invoke({"number": "42", "flag": "true"})# This would fail with a validation errortry: graph.invoke({"number": "not-a-number", "flag": "true"})except Exception as e: print(f"\nExpected validation error: {e}")
메시지 모델 작업
state 스키마에서 LangChain 메시지 타입을 사용할 때 직렬화에 대한 중요한 고려 사항이 있습니다. 메시지 객체를 네트워크를 통해 사용할 때 적절한 직렬화/역직렬화를 위해 BaseMessage 대신 AnyMessage를 사용해야 합니다.
Copy
from langgraph.graph import StateGraph, START, ENDfrom pydantic import BaseModelfrom langchain.messages import HumanMessage, AIMessage, AnyMessagefrom typing import Listclass ChatState(BaseModel): messages: List[AnyMessage] context: strdef add_message(state: ChatState): return {"messages": state.messages + [AIMessage(content="Hello there!")]}builder = StateGraph(ChatState)builder.add_node("add_message", add_message)builder.add_edge(START, "add_message")builder.add_edge("add_message", END)graph = builder.compile()# Create input with a messageinitial_state = ChatState( messages=[HumanMessage(content="Hi")], context="Customer support chat")result = graph.invoke(initial_state)print(f"Output: {result}")# Convert back to Pydantic model to see message typesoutput_model = ChatState(**result)for i, msg in enumerate(output_model.messages): print(f"Message {i}: {type(msg).__name__} - {msg.content}")
================================ Human Message ================================hi================================== Ai Message ==================================Ciao! Come posso aiutarti oggi?
노드에 사용자 정의 재시도 정책을 적용하고 싶은 많은 사용 사례가 있습니다. 예를 들어 API를 호출하거나, 데이터베이스를 쿼리하거나, LLM을 호출하는 경우 등입니다. LangGraph를 사용하면 노드에 재시도 정책을 추가할 수 있습니다.재시도 정책을 구성하려면 add_node에 retry_policy 매개변수를 전달합니다. retry_policy 매개변수는 RetryPolicy named tuple 객체를 받습니다. 아래에서는 기본 매개변수로 RetryPolicy 객체를 인스턴스화하고 노드와 연결합니다:
Copy
from langgraph.types import RetryPolicybuilder.add_node( "node_name", node_function, retry_policy=RetryPolicy(),)
기본적으로 retry_on 매개변수는 다음을 제외한 모든 예외에서 재시도하는 default_retry_on 함수를 사용합니다:
ValueError
TypeError
ArithmeticError
ImportError
LookupError
NameError
SyntaxError
RuntimeError
ReferenceError
StopIteration
StopAsyncIteration
OSError
또한 requests 및 httpx와 같은 인기 있는 http 요청 라이브러리의 예외에 대해서는 5xx 상태 코드에서만 재시도합니다.
확장 예제: 재시도 정책 사용자 정의
SQL 데이터베이스에서 읽는 예제를 고려해 보겠습니다. 아래에서는 노드에 두 가지 다른 재시도 정책을 전달합니다:
노드 캐싱은 비용이 많이 드는(시간 또는 비용 측면에서) 작업을 반복하지 않으려는 경우에 유용합니다. LangGraph를 사용하면 그래프의 노드에 개별화된 캐싱 정책을 추가할 수 있습니다.캐시 정책을 구성하려면 add_node 함수에 cache_policy 매개변수를 전달합니다. 다음 예제에서는 CachePolicy 객체가 120초의 time to live와 기본 key_func 생성기로 인스턴스화됩니다. 그런 다음 노드와 연결됩니다:
Copy
from langgraph.types import CachePolicybuilder.add_node( "node_name", node_function, cache_policy=CachePolicy(ttl=120),)
그런 다음 그래프에 대해 노드 수준 캐싱을 활성화하려면 그래프를 컴파일할 때 cache 인수를 설정합니다. 아래 예제는 InMemoryCache를 사용하여 인메모리 캐시로 그래프를 설정하지만 SqliteCache도 사용할 수 있습니다.
Copy
from langgraph.cache.memory import InMemoryCachegraph = builder.compile(cache=InMemoryCache())
state에 업데이트를 발행할 때 각 노드는 업데이트하려는 키의 값만 지정할 수 있습니다.기본적으로 이것은 해당 키의 값을 덮어씁니다. reducers를 사용하여 업데이트 처리 방식을 제어할 수도 있습니다. 예를 들어 키에 연속적인 업데이트를 추가할 수 있습니다. 자세한 내용은 이 섹션을 참조하세요.
마지막으로 그래프를 정의합니다. StateGraph를 사용하여 이 state에서 작동하는 그래프를 정의합니다.그런 다음 add_node 및 add_edge를 사용하여 그래프를 채우고 제어 흐름을 정의합니다.
노드의 병렬 실행은 전체 그래프 작업 속도를 높이는 데 필수적입니다. LangGraph는 노드의 병렬 실행에 대한 기본 지원을 제공하여 그래프 기반 워크플로우의 성능을 크게 향상시킬 수 있습니다. 이 병렬화는 표준 엣지와 conditional_edges를 모두 활용하여 팬아웃 및 팬인 메커니즘을 통해 달성됩니다. 아래는 작동하는 분기 데이터 플로우를 추가하는 방법을 보여주는 몇 가지 예제입니다.
이 예제에서는 Node A에서 B와 C로 팬아웃한 다음 D로 팬인합니다. state에서 reducer add 연산을 지정합니다. 이것은 기존 값을 단순히 덮어쓰는 대신 State의 특정 키에 대한 값을 결합하거나 누적합니다. 리스트의 경우 이것은 새 리스트를 기존 리스트와 연결하는 것을 의미합니다. reducer로 state를 업데이트하는 방법에 대한 자세한 내용은 위의 state reducers 섹션을 참조하세요.
Copy
import operatorfrom typing import Annotated, Anyfrom typing_extensions import TypedDictfrom langgraph.graph import StateGraph, START, ENDclass State(TypedDict): # The operator.add reducer fn makes this append-only aggregate: Annotated[list, operator.add]def a(state: State): print(f'Adding "A" to {state["aggregate"]}') return {"aggregate": ["A"]}def b(state: State): print(f'Adding "B" to {state["aggregate"]}') return {"aggregate": ["B"]}def c(state: State): print(f'Adding "C" to {state["aggregate"]}') return {"aggregate": ["C"]}def d(state: State): print(f'Adding "D" to {state["aggregate"]}') return {"aggregate": ["D"]}builder = StateGraph(State)builder.add_node(a)builder.add_node(b)builder.add_node(c)builder.add_node(d)builder.add_edge(START, "a")builder.add_edge("a", "b")builder.add_edge("a", "c")builder.add_edge("b", "d")builder.add_edge("c", "d")builder.add_edge("d", END)graph = builder.compile()
Copy
from IPython.display import Image, displaydisplay(Image(graph.get_graph().draw_mermaid_png()))
Adding "A" to []Adding "B" to ['A']Adding "C" to ['A']Adding "D" to ['A', 'B', 'C']
위의 예제에서 노드 "b"와 "c"는 동일한 superstep에서 동시에 실행됩니다. 동일한 단계에 있기 때문에 노드 "d"는 "b"와 "c"가 모두 완료된 후에 실행됩니다.중요한 것은 병렬 superstep의 업데이트가 일관되게 정렬되지 않을 수 있다는 것입니다. 병렬 superstep의 업데이트에 대해 일관되고 미리 결정된 순서가 필요한 경우, 출력을 state의 별도 필드에 순서를 지정할 값과 함께 작성해야 합니다.
예외 처리는?
LangGraph는 supersteps 내에서 노드를 실행합니다. 즉, 병렬 분기가 병렬로 실행되는 동안 전체 superstep은 트랜잭션입니다. 이러한 분기 중 하나라도 예외를 발생시키면 업데이트가 state에 적용되지 않습니다(전체 superstep이 오류 발생).중요한 것은 checkpointer를 사용할 때 superstep 내의 성공한 노드의 결과가 저장되고 재개될 때 반복되지 않는다는 것입니다.오류가 발생하기 쉬운 경우(불안정한 API 호출을 처리하고 싶을 수 있음), LangGraph는 이를 해결하는 두 가지 방법을 제공합니다:
노드 내에서 일반 python 코드를 작성하여 예외를 포착하고 처리할 수 있습니다.
**retry_policy**를 설정하여 특정 유형의 예외를 발생시키는 노드를 재시도하도록 그래프에 지시할 수 있습니다. 실패한 분기만 재시도되므로 중복 작업을 수행할 걱정이 없습니다.
이들을 함께 사용하면 병렬 실행을 수행하고 예외 처리를 완전히 제어할 수 있습니다.
최대 동시성 설정
그래프를 호출할 때 configuration에서 max_concurrency를 설정하여 최대 동시 작업 수를 제어할 수 있습니다.
노드 실행 연기는 다른 모든 대기 중인 작업이 완료될 때까지 노드 실행을 지연하려는 경우에 유용합니다. 이것은 map-reduce 플로우와 같이 분기의 길이가 다른 워크플로우에서 특히 관련이 있습니다.위의 예제는 각 경로가 한 단계만 있을 때 팬아웃 및 팬인하는 방법을 보여주었습니다. 하지만 한 분기에 두 개 이상의 단계가 있다면 어떻게 될까요? "b" 분기에 노드 "b_2"를 추가해 보겠습니다:
Copy
import operatorfrom typing import Annotated, Anyfrom typing_extensions import TypedDictfrom langgraph.graph import StateGraph, START, ENDclass State(TypedDict): # The operator.add reducer fn makes this append-only aggregate: Annotated[list, operator.add]def a(state: State): print(f'Adding "A" to {state["aggregate"]}') return {"aggregate": ["A"]}def b(state: State): print(f'Adding "B" to {state["aggregate"]}') return {"aggregate": ["B"]}def b_2(state: State): print(f'Adding "B_2" to {state["aggregate"]}') return {"aggregate": ["B_2"]}def c(state: State): print(f'Adding "C" to {state["aggregate"]}') return {"aggregate": ["C"]}def d(state: State): print(f'Adding "D" to {state["aggregate"]}') return {"aggregate": ["D"]}builder = StateGraph(State)builder.add_node(a)builder.add_node(b)builder.add_node(b_2)builder.add_node(c)builder.add_node(d, defer=True) builder.add_edge(START, "a")builder.add_edge("a", "b")builder.add_edge("a", "c")builder.add_edge("b", "b_2")builder.add_edge("b_2", "d")builder.add_edge("c", "d")builder.add_edge("d", END)graph = builder.compile()
Copy
from IPython.display import Image, displaydisplay(Image(graph.get_graph().draw_mermaid_png()))
Copy
graph.invoke({"aggregate": []})
Copy
Adding "A" to []Adding "B" to ['A']Adding "C" to ['A']Adding "B_2" to ['A', 'B', 'C']Adding "D" to ['A', 'B', 'C', 'B_2']
위의 예제에서 노드 "b"와 "c"는 동일한 superstep에서 동시에 실행됩니다. 노드 d에 defer=True를 설정하여 모든 대기 중인 작업이 완료될 때까지 실행되지 않도록 합니다. 이 경우 "d"는 전체 "b" 분기가 완료될 때까지 실행을 기다립니다.
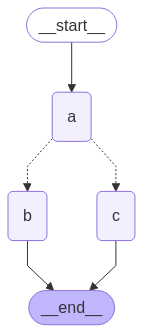
런타임에 state에 따라 팬아웃이 달라져야 하는 경우 add_conditional_edges를 사용하여 그래프 state를 사용하여 하나 이상의 경로를 선택할 수 있습니다. 아래 예제를 참조하세요. 여기서 노드 a는 다음 노드를 결정하는 state 업데이트를 생성합니다.
Copy
import operatorfrom typing import Annotated, Literal, Sequencefrom typing_extensions import TypedDictfrom langgraph.graph import StateGraph, START, ENDclass State(TypedDict): aggregate: Annotated[list, operator.add] # Add a key to the state. We will set this key to determine # how we branch. which: strdef a(state: State): print(f'Adding "A" to {state["aggregate"]}') return {"aggregate": ["A"], "which": "c"} def b(state: State): print(f'Adding "B" to {state["aggregate"]}') return {"aggregate": ["B"]}def c(state: State): print(f'Adding "C" to {state["aggregate"]}') return {"aggregate": ["C"]}builder = StateGraph(State)builder.add_node(a)builder.add_node(b)builder.add_node(c)builder.add_edge(START, "a")builder.add_edge("b", END)builder.add_edge("c", END)def conditional_edge(state: State) -> Literal["b", "c"]: # Fill in arbitrary logic here that uses the state # to determine the next node return state["which"]builder.add_conditional_edges("a", conditional_edge) graph = builder.compile()
Copy
from IPython.display import Image, displaydisplay(Image(graph.get_graph().draw_mermaid_png()))
Copy
result = graph.invoke({"aggregate": []})print(result)
Copy
Adding "A" to []Adding "C" to ['A']{'aggregate': ['A', 'C'], 'which': 'c'}
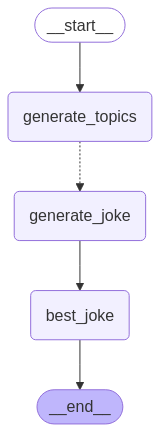
LangGraph는 Send API를 사용하여 map-reduce 및 기타 고급 분기 패턴을 지원합니다. 사용 방법의 예는 다음과 같습니다:
Copy
from langgraph.graph import StateGraph, START, ENDfrom langgraph.types import Sendfrom typing_extensions import TypedDict, Annotatedimport operatorclass OverallState(TypedDict): topic: str subjects: list[str] jokes: Annotated[list[str], operator.add] best_selected_joke: strdef generate_topics(state: OverallState): return {"subjects": ["lions", "elephants", "penguins"]}def generate_joke(state: OverallState): joke_map = { "lions": "Why don't lions like fast food? Because they can't catch it!", "elephants": "Why don't elephants use computers? They're afraid of the mouse!", "penguins": "Why don't penguins like talking to strangers at parties? Because they find it hard to break the ice." } return {"jokes": [joke_map[state["subject"]]]}def continue_to_jokes(state: OverallState): return [Send("generate_joke", {"subject": s}) for s in state["subjects"]]def best_joke(state: OverallState): return {"best_selected_joke": "penguins"}builder = StateGraph(OverallState)builder.add_node("generate_topics", generate_topics)builder.add_node("generate_joke", generate_joke)builder.add_node("best_joke", best_joke)builder.add_edge(START, "generate_topics")builder.add_conditional_edges("generate_topics", continue_to_jokes, ["generate_joke"])builder.add_edge("generate_joke", "best_joke")builder.add_edge("best_joke", END)graph = builder.compile()
Copy
from IPython.display import Image, displaydisplay(Image(graph.get_graph().draw_mermaid_png()))
Copy
# Call the graph: here we call it to generate a list of jokesfor step in graph.stream({"topic": "animals"}): print(step)
Copy
{'generate_topics': {'subjects': ['lions', 'elephants', 'penguins']}}{'generate_joke': {'jokes': ["Why don't lions like fast food? Because they can't catch it!"]}}{'generate_joke': {'jokes': ["Why don't elephants use computers? They're afraid of the mouse!"]}}{'generate_joke': {'jokes': ['Why don't penguins like talking to strangers at parties? Because they find it hard to break the ice.']}}{'best_joke': {'best_selected_joke': 'penguins'}}
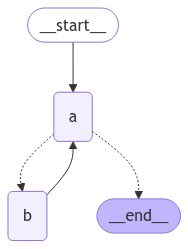
루프가 있는 그래프를 만들 때 실행을 종료하는 메커니즘이 필요합니다. 이것은 일반적으로 종료 조건에 도달하면 END 노드로 라우팅하는 conditional edge를 추가하여 수행됩니다.그래프를 호출하거나 스트리밍할 때 그래프 재귀 제한을 설정할 수도 있습니다. 재귀 제한은 오류를 발생시키기 전에 그래프가 실행할 수 있는 supersteps 수를 설정합니다. 재귀 제한의 개념에 대한 자세한 내용은 여기를 참조하세요.이러한 메커니즘이 어떻게 작동하는지 더 잘 이해하기 위해 루프가 있는 간단한 그래프를 고려해 보겠습니다.
builder = StateGraph(State)builder.add_node(a)builder.add_node(b)def route(state: State) -> Literal["b", END]: if termination_condition(state): return END else: return "b"builder.add_edge(START, "a")builder.add_conditional_edges("a", route)builder.add_edge("b", "a")graph = builder.compile()
재귀 제한을 제어하려면 config에서 "recursionLimit"을 지정합니다. 이것은 GraphRecursionError를 발생시키며, 이를 포착하고 처리할 수 있습니다:
Copy
from langgraph.errors import GraphRecursionErrortry: graph.invoke(inputs, {"recursion_limit": 3})except GraphRecursionError: print("Recursion Error")
간단한 루프가 있는 그래프를 정의해 보겠습니다. 종료 조건을 구현하기 위해 조건부 엣지를 사용합니다.
Copy
import operatorfrom typing import Annotated, Literalfrom typing_extensions import TypedDictfrom langgraph.graph import StateGraph, START, ENDclass State(TypedDict): # The operator.add reducer fn makes this append-only aggregate: Annotated[list, operator.add]def a(state: State): print(f'Node A sees {state["aggregate"]}') return {"aggregate": ["A"]}def b(state: State): print(f'Node B sees {state["aggregate"]}') return {"aggregate": ["B"]}# Define nodesbuilder = StateGraph(State)builder.add_node(a)builder.add_node(b)# Define edgesdef route(state: State) -> Literal["b", END]: if len(state["aggregate"]) < 7: return "b" else: return ENDbuilder.add_edge(START, "a")builder.add_conditional_edges("a", route)builder.add_edge("b", "a")graph = builder.compile()
Copy
from IPython.display import Image, displaydisplay(Image(graph.get_graph().draw_mermaid_png()))
이 아키텍처는 노드 "a"가 도구 호출 모델이고 노드 "b"가 도구를 나타내는 ReAct agent와 유사합니다.route 조건부 엣지에서 state의 "aggregate" 리스트가 임계값 길이를 초과한 후 종료하도록 지정합니다.그래프를 호출하면 종료 조건에 도달할 때까지 노드 "a"와 "b" 사이를 번갈아 가며 종료되는 것을 볼 수 있습니다.
Copy
graph.invoke({"aggregate": []})
Copy
Node A sees []Node B sees ['A']Node A sees ['A', 'B']Node B sees ['A', 'B', 'A']Node A sees ['A', 'B', 'A', 'B']Node B sees ['A', 'B', 'A', 'B', 'A']Node A sees ['A', 'B', 'A', 'B', 'A', 'B']
일부 애플리케이션에서는 주어진 종료 조건에 도달한다는 보장이 없을 수 있습니다. 이러한 경우 그래프의 recursion limit을 설정할 수 있습니다. 이것은 주어진 수의 supersteps 후에 GraphRecursionError를 발생시킵니다. 그런 다음 이 예외를 포착하고 처리할 수 있습니다:
Node A sees []Node B sees ['A']Node C sees ['A', 'B']Node D sees ['A', 'B']Node A sees ['A', 'B', 'C', 'D']Recursion Error
확장 예제: 재귀 제한 도달 시 state 반환
GraphRecursionError를 발생시키는 대신 재귀 제한에 도달할 때까지 남은 단계 수를 추적하는 새 키를 state에 도입할 수 있습니다. 그런 다음 이 키를 사용하여 실행을 종료해야 하는지 결정할 수 있습니다.LangGraph는 특수 RemainingSteps 주석을 구현합니다. 내부적으로 ManagedValue 채널을 생성합니다 — 그래프 실행 기간 동안 존재하고 더 이상 존재하지 않는 state 채널입니다.
Copy
import operatorfrom typing import Annotated, Literalfrom typing_extensions import TypedDictfrom langgraph.graph import StateGraph, START, ENDfrom langgraph.managed.is_last_step import RemainingStepsclass State(TypedDict): aggregate: Annotated[list, operator.add] remaining_steps: RemainingStepsdef a(state: State): print(f'Node A sees {state["aggregate"]}') return {"aggregate": ["A"]}def b(state: State): print(f'Node B sees {state["aggregate"]}') return {"aggregate": ["B"]}# Define nodesbuilder = StateGraph(State)builder.add_node(a)builder.add_node(b)# Define edgesdef route(state: State) -> Literal["b", END]: if state["remaining_steps"] <= 2: return END else: return "b"builder.add_edge(START, "a")builder.add_conditional_edges("a", route)builder.add_edge("b", "a")graph = builder.compile()# Test it outresult = graph.invoke({"aggregate": []}, {"recursion_limit": 4})print(result)
Copy
Node A sees []Node B sees ['A']Node A sees ['A', 'B']{'aggregate': ['A', 'B', 'A']}
확장 예제: 분기가 있는 루프
재귀 제한이 어떻게 작동하는지 더 잘 이해하기 위해 더 복잡한 예제를 고려해 보겠습니다. 아래에서는 루프를 구현하지만 한 단계가 두 개의 노드로 팬아웃됩니다:
Copy
import operatorfrom typing import Annotated, Literalfrom typing_extensions import TypedDictfrom langgraph.graph import StateGraph, START, ENDclass State(TypedDict): aggregate: Annotated[list, operator.add]def a(state: State): print(f'Node A sees {state["aggregate"]}') return {"aggregate": ["A"]}def b(state: State): print(f'Node B sees {state["aggregate"]}') return {"aggregate": ["B"]}def c(state: State): print(f'Node C sees {state["aggregate"]}') return {"aggregate": ["C"]}def d(state: State): print(f'Node D sees {state["aggregate"]}') return {"aggregate": ["D"]}# Define nodesbuilder = StateGraph(State)builder.add_node(a)builder.add_node(b)builder.add_node(c)builder.add_node(d)# Define edgesdef route(state: State) -> Literal["b", END]: if len(state["aggregate"]) < 7: return "b" else: return ENDbuilder.add_edge(START, "a")builder.add_conditional_edges("a", route)builder.add_edge("b", "c")builder.add_edge("b", "d")builder.add_edge(["c", "d"], "a")graph = builder.compile()
Copy
from IPython.display import Image, displaydisplay(Image(graph.get_graph().draw_mermaid_png()))
노드 C와 D가 동시에 실행되는 네 개의 superstep 루프가 있습니다.이전과 같이 그래프를 호출하면 종료 조건에 도달하기 전에 두 번의 완전한 “랩”을 완료하는 것을 볼 수 있습니다:
Copy
result = graph.invoke({"aggregate": []})
Copy
Node A sees []Node B sees ['A']Node D sees ['A', 'B']Node C sees ['A', 'B']Node A sees ['A', 'B', 'C', 'D']Node B sees ['A', 'B', 'C', 'D', 'A']Node D sees ['A', 'B', 'C', 'D', 'A', 'B']Node C sees ['A', 'B', 'C', 'D', 'A', 'B']Node A sees ['A', 'B', 'C', 'D', 'A', 'B', 'C', 'D']
그러나 재귀 제한을 4로 설정하면 각 랩이 4개의 superstep이기 때문에 한 랩만 완료합니다:
Copy
from langgraph.errors import GraphRecursionErrortry: result = graph.invoke({"aggregate": []}, {"recursion_limit": 4})except GraphRecursionError: print("Recursion Error")
Copy
Node A sees []Node B sees ['A']Node C sees ['A', 'B']Node D sees ['A', 'B']Node A sees ['A', 'B', 'C', 'D']Recursion Error
비동기 프로그래밍 패러다임을 사용하면 IO-bound 코드를 동시에 실행할 때 상당한 성능 향상을 얻을 수 있습니다(예: 채팅 모델 제공자에 대한 동시 API 요청).그래프의 sync 구현을 async 구현으로 변환하려면 다음을 수행해야 합니다:
nodes를 def 대신 async def를 사용하도록 업데이트합니다.
내부 코드를 적절하게 await를 사용하도록 업데이트합니다.
원하는 대로 .ainvoke 또는 .astream으로 그래프를 호출합니다.
많은 LangChain 객체가 모든 sync 메서드의 async 변형을 가진 Runnable Protocol을 구현하기 때문에 일반적으로 sync 그래프를 async 그래프로 업그레이드하는 것이 상당히 빠릅니다.아래 예제를 참조하세요. 기본 LLM의 비동기 호출을 시연하기 위해 채팅 모델을 포함할 것입니다:
Combine control flow and state updates with Command
제어 흐름(엣지)과 상태 업데이트(노드)를 결합하는 것이 유용할 수 있습니다. 예를 들어, 동일한 노드에서 상태 업데이트를 수행하고 다음에 갈 노드를 결정하고 싶을 수 있습니다. LangGraph는 노드 함수에서 Command 객체를 반환하여 이를 수행하는 방법을 제공합니다:
Copy
def my_node(state: State) -> Command[Literal["my_other_node"]]:
    return Command(
        # state update
        update={"foo": "bar"},
        # control flow
        goto="my_other_node"
    )
아래에서 엔드투엔드 예제를 보여줍니다. A, B, C 세 개의 노드가 있는 간단한 그래프를 만들어 보겠습니다. 먼저 노드 A를 실행한 다음 노드 A의 출력에 따라 노드 B 또는 노드 C로 갈지 결정합니다.
Copy
import randomfrom typing_extensions import TypedDict, Literalfrom langgraph.graph import StateGraph, STARTfrom langgraph.types import Command# Define graph stateclass State(TypedDict): foo: str# Define the nodesdef node_a(state: State) -> Command[Literal["node_b", "node_c"]]: print("Called A") value = random.choice(["b", "c"]) # this is a replacement for a conditional edge function if value == "b": goto = "node_b" else: goto = "node_c" # note how Command allows you to BOTH update the graph state AND route to the next node return Command( # this is the state update update={"foo": value}, # this is a replacement for an edge goto=goto, )def node_b(state: State): print("Called B") return {"foo": state["foo"] + "b"}def node_c(state: State): print("Called C") return {"foo": state["foo"] + "c"}
builder = StateGraph(State)builder.add_edge(START, "node_a")builder.add_node(node_a)builder.add_node(node_b)builder.add_node(node_c)# NOTE: there are no edges between nodes A, B and C!graph = builder.compile()
Command를 반환 타입 주석으로 사용했다는 것을 알 수 있습니다. 예: Command[Literal["node_b", "node_c"]]. 이것은 그래프 렌더링에 필요하며 LangGraph에 node_a가 node_b와 node_c로 이동할 수 있음을 알려줍니다.
Copy
from IPython.display import display, Imagedisplay(Image(graph.get_graph().draw_mermaid_png()))
그래프를 여러 번 실행하면 노드 A의 무작위 선택에 따라 다른 경로(A -> B 또는 A -> C)를 취하는 것을 볼 수 있습니다.
subgraphs를 사용하는 경우 서브그래프 내의 노드에서 다른 서브그래프(즉, 부모 그래프의 다른 노드)로 이동하고 싶을 수 있습니다. 이렇게 하려면 Command에서 graph=Command.PARENT를 지정할 수 있습니다:
Copy
def my_node(state: State) -> Command[Literal["my_other_node"]]:
    return Command(
        update={"foo": "bar"},
        goto="other_subgraph",  # where `other_subgraph` is a node in the parent graph
        graph=Command.PARENT
    )
위의 예제를 사용하여 이를 시연해 보겠습니다. 위의 예제에서 nodeA를 부모 그래프에 서브그래프로 추가할 단일 노드 그래프로 변경하여 이를 수행합니다.
Command.PARENT를 사용한 상태 업데이트
서브그래프 노드에서 부모 그래프 노드로 부모와 서브그래프 state schemas 모두에서 공유되는 키에 대한 업데이트를 보낼 때, 부모 그래프 state에서 업데이트하는 키에 대해 reducer를 반드시 정의해야 합니다. 아래 예제를 참조하세요.
Copy
import operatorfrom typing_extensions import Annotatedclass State(TypedDict): # NOTE: we define a reducer here foo: Annotated[str, operator.add] def node_a(state: State): print("Called A") value = random.choice(["a", "b"]) # this is a replacement for a conditional edge function if value == "a": goto = "node_b" else: goto = "node_c" # note how Command allows you to BOTH update the graph state AND route to the next node return Command( update={"foo": value}, goto=goto, # this tells LangGraph to navigate to node_b or node_c in the parent graph # NOTE: this will navigate to the closest parent graph relative to the subgraph graph=Command.PARENT, )subgraph = StateGraph(State).add_node(node_a).add_edge(START, "node_a").compile()def node_b(state: State): print("Called B") # NOTE: since we've defined a reducer, we don't need to manually append # new characters to existing 'foo' value. instead, reducer will append these # automatically (via operator.add) return {"foo": "b"} def node_c(state: State): print("Called C") return {"foo": "c"} builder = StateGraph(State)builder.add_edge(START, "subgraph")builder.add_node("subgraph", subgraph)builder.add_node(node_b)builder.add_node(node_c)graph = builder.compile()
일반적인 사용 사례는 도구 내부에서 그래프 state를 업데이트하는 것입니다. 예를 들어, 고객 지원 애플리케이션에서 대화 시작 시 계정 번호 또는 ID를 기반으로 고객 정보를 조회하고 싶을 수 있습니다. 도구에서 그래프 state를 업데이트하려면 도구에서 Command(update={"my_custom_key": "foo", "messages": [...]})를 반환할 수 있습니다:
Copy
@tooldef lookup_user_info(tool_call_id: Annotated[str, InjectedToolCallId], config: RunnableConfig): """Use this to look up user information to better assist them with their questions.""" user_info = get_user_info(config.get("configurable", {}).get("user_id")) return Command( update={ # update the state keys "user_info": user_info, # update the message history "messages": [ToolMessage("Successfully looked up user information", tool_call_id=tool_call_id)] } )
도구에서 Command를 반환할 때 Command.update에 messages(또는 메시지 기록에 사용되는 state 키)를 반드시 포함해야 하며 messages의 메시지 목록에는 ToolMessage가 반드시 포함되어야 합니다. 이것은 결과 메시지 기록이 유효하도록 하기 위해 필요합니다(LLM 제공자는 도구 호출이 있는 AI 메시지 다음에 도구 결과 메시지가 와야 함을 요구합니다).
Command를 통해 state를 업데이트하는 도구를 사용하는 경우, Command 객체를 반환하는 도구를 자동으로 처리하고 그래프 state로 전파하는 사전 구축된 ToolNode를 사용하는 것이 좋습니다. 도구를 호출하는 사용자 정의 노드를 작성하는 경우 도구에서 반환된 Command 객체를 노드의 업데이트로 수동으로 전파해야 합니다.
원하는 경우 그래프를 .png로 렌더링할 수 있습니다. 여기서는 세 가지 옵션을 사용할 수 있습니다:
Mermaid.ink API 사용(추가 패키지 불필요)
Mermaid + Pyppeteer 사용(pip install pyppeteer 필요)
graphviz 사용(pip install graphviz 필요)
Mermaid.Ink 사용기본적으로 draw_mermaid_png()는 Mermaid.Ink의 API를 사용하여 다이어그램을 생성합니다.
Copy
from IPython.display import Image, displayfrom langchain_core.runnables.graph import CurveStyle, MermaidDrawMethod, NodeStylesdisplay(Image(app.get_graph().draw_mermaid_png()))
Mermaid + Pyppeteer 사용
Copy
import nest_asyncionest_asyncio.apply() # Required for Jupyter Notebook to run async functionsdisplay( Image( app.get_graph().draw_mermaid_png( curve_style=CurveStyle.LINEAR, node_colors=NodeStyles(first="#ffdfba", last="#baffc9", default="#fad7de"), wrap_label_n_words=9, output_file_path=None, draw_method=MermaidDrawMethod.PYPPETEER, background_color="white", padding=10, ) ))
Graphviz 사용
Copy
try: display(Image(app.get_graph().draw_png()))except ImportError: print( "You likely need to install dependencies for pygraphviz, see more here https://github.com/pygraphviz/pygraphviz/blob/main/INSTALL.txt" )


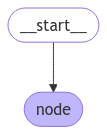 이 경우 그래프는 단일 노드만 실행합니다. 간단한 호출을 진행해 보겠습니다:
 간단한 호출을 진행해 보겠습니다:다음 사항에 유의하세요:
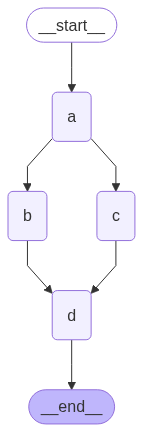 reducer를 사용하면 각 노드에 추가된 값이 누적되는 것을 볼 수 있습니다.

 이 아키텍처는 노드
 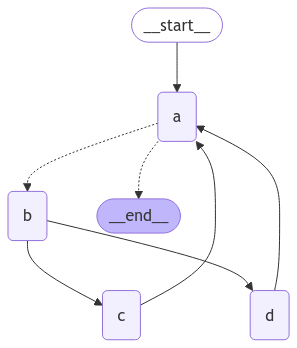 이 그래프는 복잡해 보이지만 supersteps의 루프로 개념화할 수 있습니다:그러나 재귀 제한을 4로 설정하면 각 랩이 4개의 superstep이기 때문에 한 랩만 완료합니다:
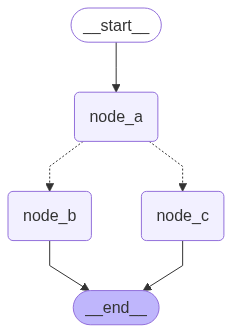 그래프를 여러 번 실행하면 노드 A의 무작위 선택에 따라 다른 경로(A -> B 또는 A -> C)를 취하는 것을 볼 수 있습니다.
 Mermaid + Pyppeteer 사용