이 튜토리얼은 사용자 피드백을 기반으로 classifier를 최적화하는 과정을 안내합니다. Classifier는 일반적으로 원하는 출력을 수집하기가 매우 간단하기 때문에 최적화하기에 좋으며, 이를 통해 사용자 피드백을 기반으로 few shot 예제를 쉽게 만들 수 있습니다. 이 예제에서 정확히 그렇게 할 것입니다.

목표

이 예제에서는 GitHub 이슈를 제목을 기반으로 분류하는 봇을 만들 것입니다. 제목을 입력받아 여러 다른 클래스 중 하나로 분류합니다. 그런 다음 사용자 피드백을 수집하기 시작하고 이를 사용하여 classifier의 성능을 개선할 것입니다.

시작하기

시작하려면 먼저 모든 trace를 특정 프로젝트로 보내도록 설정합니다. 환경 변수를 설정하여 이를 수행할 수 있습니다:
import os
os.environ["LANGSMITH_PROJECT"] = "classifier"
그런 다음 초기 애플리케이션을 만들 수 있습니다. 이것은 GitHub 이슈 제목을 입력받아 레이블을 지정하려고 시도하는 매우 간단한 함수입니다.
import openai
from langsmith import traceable, Client
import uuid

client = openai.Client()

available_topics = [
    "bug",
    "improvement",
    "new_feature",
    "documentation",
    "integration",
]

prompt_template = """Classify the type of the issue as one of {topics}.
Issue: {text}"""

@traceable(
    run_type="chain",
    name="Classifier",
)
def topic_classifier(
    topic: str):
    return client.chat.completions.create(
        model="gpt-4o-mini",
        temperature=0,
        messages=[
            {
                "role": "user",
                "content": prompt_template.format(
                    topics=','.join(available_topics),
                    text=topic,
                )
            }
        ],
    ).choices[0].message.content
이제 이것과 상호작용을 시작할 수 있습니다. 상호작용할 때 LangSmith run id를 미리 생성하고 이 함수에 전달합니다. 나중에 피드백을 첨부할 수 있도록 이렇게 합니다. 애플리케이션을 호출하는 방법은 다음과 같습니다:
run_id = uuid.uuid4()
topic_classifier(
    "fix bug in LCEL",
    langsmith_extra={"run_id": run_id})
이후에 피드백을 첨부하는 방법은 다음과 같습니다. 두 가지 형태로 피드백을 수집할 수 있습니다. 먼저, “긍정적인” 피드백을 수집할 수 있습니다 - 이것은 모델이 올바르게 처리한 예제를 위한 것입니다.
ls_client = Client()
run_id = uuid.uuid4()
topic_classifier(
    "fix bug in LCEL",
    langsmith_extra={"run_id": run_id})
ls_client.create_feedback(
    run_id,
    key="user-score",
    score=1.0,
)
다음으로, 생성에 대한 “수정”에 해당하는 피드백 수집에 집중할 수 있습니다. 이 예제에서 모델은 이것을 버그로 분류하지만, 실제로는 이것을 documentation으로 분류하고 싶습니다.
ls_client = Client()
run_id = uuid.uuid4()
topic_classifier(
    "fix bug in documentation",
    langsmith_extra={"run_id": run_id})
ls_client.create_feedback(
    run_id,
    key="correction",
    correction="documentation")

자동화 설정하기

이제 어떤 형태의 피드백이 있는 예제를 dataset으로 이동시키는 자동화를 설정할 수 있습니다. 긍정적인 피드백과 부정적인 피드백에 대해 각각 하나씩 두 개의 자동화를 설정할 것입니다. 첫 번째는 긍정적인 피드백이 있는 모든 run을 자동으로 dataset에 추가합니다. 이것의 논리는 긍정적인 피드백이 있는 모든 run을 향후 반복에서 좋은 예제로 사용할 수 있다는 것입니다. 이 데이터를 추가할 classifier-github-issues라는 dataset을 만들어 봅시다. Optimization Negative 
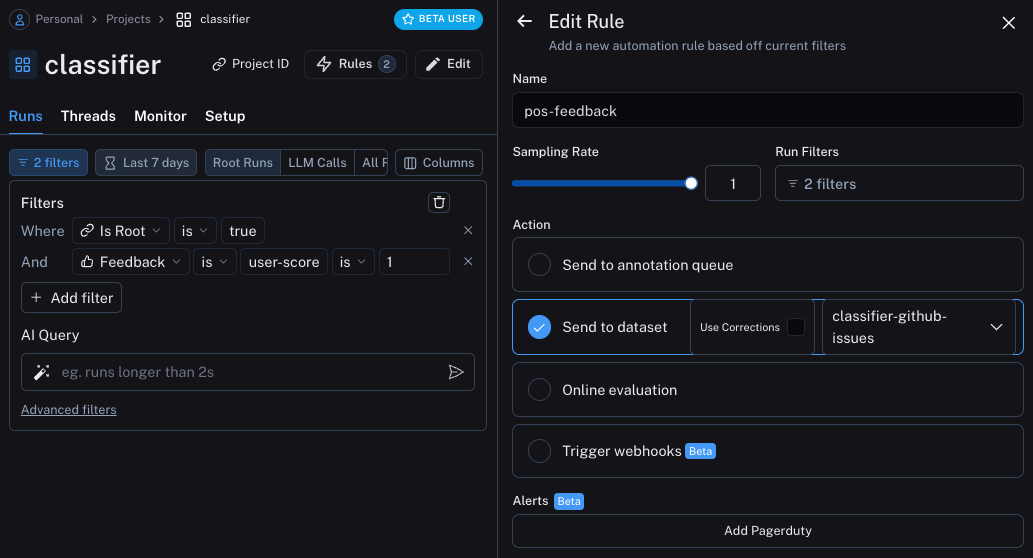
두 번째는 수정이 있는 모든 run을 가져와 webhook을 사용하여 dataset에 추가합니다. 이 webhook을 생성할 때 “Use Corrections” 옵션을 선택합니다. 이 옵션은 run에서 dataset을 생성할 때 run의 출력을 datapoint의 정답 출력으로 사용하는 대신 수정 사항을 사용하도록 합니다. Optimization Positive

애플리케이션 업데이트하기

이제 run을 보내고 있는 dataset을 가져오도록 코드를 업데이트할 수 있습니다. 가져온 후에는 예제가 포함된 문자열을 만들 수 있습니다. 그런 다음 이 문자열을 prompt의 일부로 넣을 수 있습니다!
### NEW CODE ###
# Initialize the LangSmith Client so we can use to get the dataset
ls_client = Client()

# Create a function that will take in a list of examples and format them into a string
def create_example_string(examples):
    final_strings = []
    for e in examples:
        final_strings.append(f"Input: {e.inputs['topic']}\n> {e.outputs['output']}")
    return "\n\n".join(final_strings)
### NEW CODE ###

client = openai.Client()

available_topics = [
    "bug",
    "improvement",
    "new_feature",
    "documentation",
    "integration",
]

prompt_template = """Classify the type of the issue as one of {topics}.

Here are some examples:
{examples}

Begin!
Issue: {text}
>"""

@traceable(
    run_type="chain",
    name="Classifier",
)
def topic_classifier(
    topic: str):
    # We can now pull down the examples from the dataset
    # We do this inside the function so it always get the most up-to-date examples,
    # But this can be done outside and cached for speed if desired
    examples = list(ls_client.list_examples(dataset_name="classifier-github-issues"))  # <- New Code
    example_string = create_example_string(examples)
    return client.chat.completions.create(
        model="gpt-4o-mini",
        temperature=0,
        messages=[
            {
                "role": "user",
                "content": prompt_template.format(
                    topics=','.join(available_topics),
                    text=topic,
                    examples=example_string,
                )
            }
        ],
    ).choices[0].message.content
이제 이전과 유사한 입력으로 애플리케이션을 실행하면, docs와 관련된 모든 것(버그라도)이 documentation으로 분류되어야 한다는 것을 올바르게 학습하는 것을 볼 수 있습니다.
ls_client = Client()
run_id = uuid.uuid4()
topic_classifier(
    "address bug in documentation",
    langsmith_extra={"run_id": run_id})

예제에 대한 의미론적 검색

추가로 할 수 있는 한 가지는 의미론적으로 가장 유사한 예제만 사용하는 것입니다. 이것은 많은 예제를 구축하기 시작할 때 유용합니다. 이를 위해 먼저 k개의 가장 유사한 예제를 찾는 예제를 정의할 수 있습니다:
import numpy as np

def find_similar(examples, topic, k=5):
    inputs = [e.inputs['topic'] for e in examples] + [topic]
    vectors = client.embeddings.create(input=inputs, model="text-embedding-3-small")
    vectors = [e.embedding for e in vectors.data]
    vectors = np.array(vectors)
    args = np.argsort(-vectors.dot(vectors[-1])[:-1])[:5]
    examples = [examples[i] for i in args]
    return examples
그런 다음 애플리케이션에서 이것을 사용할 수 있습니다:
ls_client = Client()

def create_example_string(examples):
    final_strings = []
    for e in examples:
        final_strings.append(f"Input: {e.inputs['topic']}\n> {e.outputs['output']}")
    return "\n\n".join(final_strings)

client = openai.Client()

available_topics = [
    "bug",
    "improvement",
    "new_feature",
    "documentation",
    "integration",
]

prompt_template = """Classify the type of the issue as one of {topics}.

Here are some examples:
{examples}

Begin!
Issue: {text}
>"""

@traceable(
    run_type="chain",
    name="Classifier",
)
def topic_classifier(
    topic: str):
    examples = list(ls_client.list_examples(dataset_name="classifier-github-issues"))
    examples = find_similar(examples, topic)
    example_string = create_example_string(examples)
    return client.chat.completions.create(
        model="gpt-4o-mini",
        temperature=0,
        messages=[
            {
                "role": "user",
                "content": prompt_template.format(
                    topics=','.join(available_topics),
                    text=topic,
                    examples=example_string,
                )
            }
        ],
    ).choices[0].message.content

Connect these docs programmatically to Claude, VSCode, and more via MCP for real-time answers.
I