개요

Agent(또는 모든 LLM 애플리케이션)를 구축할 때 가장 어려운 부분은 충분히 신뢰할 수 있게 만드는 것입니다. 프로토타입에서는 작동할 수 있지만, 실제 사용 사례에서는 종종 실패합니다.

Agent가 실패하는 이유는 무엇인가요?

Agent가 실패할 때, 일반적으로 agent 내부의 LLM 호출이 잘못된 작업을 수행하거나 예상한 대로 작동하지 않았기 때문입니다. LLM은 두 가지 이유 중 하나로 실패합니다:
  1. 기본 LLM이 충분히 유능하지 않음
  2. “올바른” context가 LLM에 전달되지 않음
대부분의 경우 - 실제로는 두 번째 이유가 agent를 신뢰할 수 없게 만드는 원인입니다. Context engineering은 LLM이 작업을 수행할 수 있도록 올바른 정보와 도구를 올바른 형식으로 제공하는 것입니다. 이것은 AI Engineer의 가장 중요한 업무입니다. 이러한 “올바른” context의 부족은 더 신뢰할 수 있는 agent를 만드는 데 있어 가장 큰 장애물이며, LangChain의 agent 추상화는 context engineering을 용이하게 하도록 독특하게 설계되었습니다.
Context engineering이 처음이신가요? 개념 개요에서 시작하여 다양한 유형의 context와 사용 시기를 이해하세요.
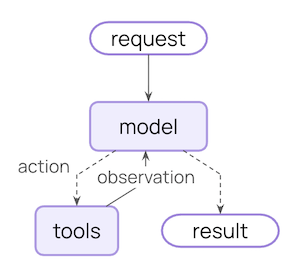
Agent loop

일반적인 agent loop는 두 가지 주요 단계로 구성됩니다:
  1. Model call - prompt와 사용 가능한 tool로 LLM을 호출하고, 응답 또는 tool 실행 요청을 반환합니다
  2. Tool execution - LLM이 요청한 tool을 실행하고, tool 결과를 반환합니다
Core agent loop diagram
이 loop는 LLM이 종료하기로 결정할 때까지 계속됩니다.

제어할 수 있는 것

신뢰할 수 있는 agent를 구축하려면 agent loop의 각 단계에서 발생하는 일과 단계 사이에 발생하는 일을 제어해야 합니다.
Context 유형제어하는 것Transient 또는 Persistent
Model ContextModel call에 들어가는 것 (지시사항, 메시지 기록, tool, 응답 형식)Transient
Tool ContextTool이 액세스하고 생성할 수 있는 것 (state, store, runtime context에 대한 읽기/쓰기)Persistent
Life-cycle ContextModel과 tool call 사이에 발생하는 것 (요약, guardrail, 로깅 등)Persistent

Transient context

LLM이 단일 호출에서 보는 것입니다. State에 저장된 내용을 변경하지 않고 메시지, tool 또는 prompt를 수정할 수 있습니다.

Persistent context

턴 전체에 걸쳐 state에 저장되는 것입니다. Life-cycle hook과 tool 쓰기는 이것을 영구적으로 수정합니다.

데이터 소스

이 과정 전반에 걸쳐 agent는 다양한 데이터 소스에 액세스(읽기/쓰기)합니다:
데이터 소스다른 이름범위예시
Runtime Context정적 구성대화 범위사용자 ID, API key, 데이터베이스 연결, 권한, 환경 설정
State단기 메모리대화 범위현재 메시지, 업로드된 파일, 인증 상태, tool 결과
Store장기 메모리대화 간사용자 선호도, 추출된 인사이트, 메모리, 과거 데이터

작동 방식

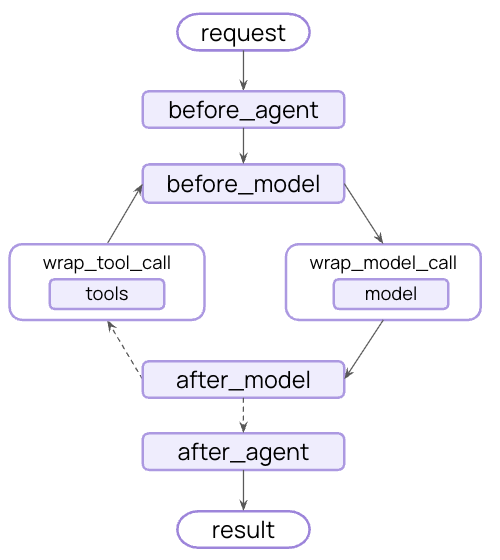
LangChain middleware는 LangChain을 사용하는 개발자에게 context engineering을 실용적으로 만드는 기본 메커니즘입니다. Middleware를 사용하면 agent 생명주기의 모든 단계에 연결하여 다음을 수행할 수 있습니다:
  • Context 업데이트
  • Agent 생명주기의 다른 단계로 이동
이 가이드 전체에서 context engineering 목적을 위한 수단으로 middleware API를 자주 사용하는 것을 볼 수 있습니다.

Model Context

각 model call에 들어가는 것을 제어합니다 - 지시사항, 사용 가능한 tool, 사용할 model, 출력 형식. 이러한 결정은 신뢰성과 비용에 직접적인 영향을 미칩니다. 이러한 모든 유형의 model context는 state(단기 메모리), store(장기 메모리) 또는 runtime context(정적 구성)에서 가져올 수 있습니다.

System Prompt

System prompt는 LLM의 동작과 기능을 설정합니다. 다른 사용자, context 또는 대화 단계에는 다른 지시사항이 필요합니다. 성공적인 agent는 메모리, 선호도 및 구성을 활용하여 대화의 현재 상태에 적합한 지시사항을 제공합니다.
  • State
  • Store
  • Runtime Context
State에서 메시지 수 또는 대화 context에 액세스:
from langchain.agents import create_agent
from langchain.agents.middleware import dynamic_prompt, ModelRequest

@dynamic_prompt
def state_aware_prompt(request: ModelRequest) -> str:
    # request.messages is a shortcut for request.state["messages"]
    message_count = len(request.messages)

    base = "You are a helpful assistant."

    if message_count > 10:
        base += "\nThis is a long conversation - be extra concise."

    return base

agent = create_agent(
    model="openai:gpt-4o",
    tools=[...],
    middleware=[state_aware_prompt]
)

Messages

Message는 LLM에 전송되는 prompt를 구성합니다. LLM이 올바른 정보를 가지고 잘 응답할 수 있도록 메시지의 내용을 관리하는 것이 중요합니다.
  • State
  • Store
  • Runtime Context
현재 쿼리와 관련이 있을 때 State에서 업로드된 파일 context를 주입:
from langchain.agents import create_agent
from langchain.agents.middleware import wrap_model_call, ModelRequest, ModelResponse
from typing import Callable

@wrap_model_call
def inject_file_context(
    request: ModelRequest,
    handler: Callable[[ModelRequest], ModelResponse]
) -> ModelResponse:
    """Inject context about files user has uploaded this session."""
    # Read from State: get uploaded files metadata
    uploaded_files = request.state.get("uploaded_files", [])  

    if uploaded_files:
        # Build context about available files
        file_descriptions = []
        for file in uploaded_files:
            file_descriptions.append(
                f"- {file['name']} ({file['type']}): {file['summary']}"
            )

        file_context = f"""Files you have access to in this conversation:
{chr(10).join(file_descriptions)}

Reference these files when answering questions."""

        # Inject file context before recent messages
        messages = [  
            *request.messages
            {"role": "user", "content": file_context},
        ]
        request = request.override(messages=messages)  

    return handler(request)

agent = create_agent(
    model="openai:gpt-4o",
    tools=[...],
    middleware=[inject_file_context]
)
Transient vs Persistent 메시지 업데이트:위의 예제는 wrap_model_call을 사용하여 transient 업데이트를 수행합니다 - state에 저장된 내용을 변경하지 않고 단일 호출에 대해 model에 전송되는 메시지를 수정합니다.State를 수정하는 persistent 업데이트(예: Life-cycle Context의 요약 예제)의 경우, before_model 또는 after_model과 같은 life-cycle hook을 사용하여 대화 기록을 영구적으로 업데이트하세요. 자세한 내용은 middleware 문서를 참조하세요.

Tools

Tool을 사용하면 model이 데이터베이스, API 및 외부 시스템과 상호 작용할 수 있습니다. Tool을 정의하고 선택하는 방법은 model이 작업을 효과적으로 완료할 수 있는지 여부에 직접적인 영향을 미칩니다.

Tool 정의

각 tool에는 명확한 이름, 설명, 인수 이름 및 인수 설명이 필요합니다. 이것들은 단순한 메타데이터가 아닙니다—tool을 언제 어떻게 사용할지에 대한 model의 추론을 안내합니다.
from langchain.tools import tool

@tool(parse_docstring=True)
def search_orders(
    user_id: str,
    status: str,
    limit: int = 10
) -> str:
    """Search for user orders by status.

    Use this when the user asks about order history or wants to check
    order status. Always filter by the provided status.

    Args:
        user_id: Unique identifier for the user
        status: Order status: 'pending', 'shipped', or 'delivered'
        limit: Maximum number of results to return
    """
    # Implementation here
    pass

Tool 선택

모든 tool이 모든 상황에 적합한 것은 아닙니다. 너무 많은 tool은 model을 압도하고(context 과부하) 오류를 증가시킬 수 있습니다; 너무 적으면 기능이 제한됩니다. 동적 tool 선택은 인증 상태, 사용자 권한, feature flag 또는 대화 단계에 따라 사용 가능한 toolset을 조정합니다.
  • State
  • Store
  • Runtime Context
특정 대화 이정표 이후에만 고급 tool 활성화:
from langchain.agents import create_agent
from langchain.agents.middleware import wrap_model_call, ModelRequest, ModelResponse
from typing import Callable

@wrap_model_call
def state_based_tools(
    request: ModelRequest,
    handler: Callable[[ModelRequest], ModelResponse]
) -> ModelResponse:
    """Filter tools based on conversation State."""
    # Read from State: check if user has authenticated
    state = request.state  
    is_authenticated = state.get("authenticated", False)  
    message_count = len(state["messages"])

    # Only enable sensitive tools after authentication
    if not is_authenticated:
        tools = [t for t in request.tools if t.name.startswith("public_")]
        request = request.override(tools=tools)  
    elif message_count < 5:
        # Limit tools early in conversation
        tools = [t for t in request.tools if t.name != "advanced_search"]
        request = request.override(tools=tools)  

    return handler(request)

agent = create_agent(
    model="openai:gpt-4o",
    tools=[public_search, private_search, advanced_search],
    middleware=[state_based_tools]
)
더 많은 예제는 동적으로 tool 선택하기를 참조하세요.

Model

다른 model은 다른 강점, 비용 및 context window를 가지고 있습니다. 당면한 작업에 적합한 model을 선택하세요. 이는 agent 실행 중에 변경될 수 있습니다.
  • State
  • Store
  • Runtime Context
State의 대화 길이에 따라 다른 model 사용:
from langchain.agents import create_agent
from langchain.agents.middleware import wrap_model_call, ModelRequest, ModelResponse
from langchain.chat_models import init_chat_model
from typing import Callable

# Initialize models once outside the middleware
large_model = init_chat_model("anthropic:claude-sonnet-4-5")
standard_model = init_chat_model("openai:gpt-4o")
efficient_model = init_chat_model("openai:gpt-4o-mini")

@wrap_model_call
def state_based_model(
    request: ModelRequest,
    handler: Callable[[ModelRequest], ModelResponse]
) -> ModelResponse:
    """Select model based on State conversation length."""
    # request.messages is a shortcut for request.state["messages"]
    message_count = len(request.messages)  

    if message_count > 20:
        # Long conversation - use model with larger context window
        model = large_model
    elif message_count > 10:
        # Medium conversation
        model = standard_model
    else:
        # Short conversation - use efficient model
        model = efficient_model

    request = request.override(model=model)  

    return handler(request)

agent = create_agent(
    model="openai:gpt-4o-mini",
    tools=[...],
    middleware=[state_based_model]
)
더 많은 예제는 동적 model을 참조하세요.

Response Format

구조화된 출력은 비구조화된 텍스트를 검증된 구조화된 데이터로 변환합니다. 특정 필드를 추출하거나 다운스트림 시스템에 대한 데이터를 반환할 때 자유 형식 텍스트는 충분하지 않습니다. 작동 방식: 응답 형식으로 스키마를 제공하면 model의 최종 응답이 해당 스키마를 준수하도록 보장됩니다. Agent는 model이 tool 호출을 완료할 때까지 model / tool 호출 loop를 실행한 다음 최종 응답이 제공된 형식으로 강제 변환됩니다.

형식 정의

스키마 정의는 model을 안내합니다. 필드 이름, 유형 및 설명은 출력이 준수해야 하는 형식을 정확히 지정합니다.
from pydantic import BaseModel, Field

class CustomerSupportTicket(BaseModel):
    """Structured ticket information extracted from customer message."""

    category: str = Field(
        description="Issue category: 'billing', 'technical', 'account', or 'product'"
    )
    priority: str = Field(
        description="Urgency level: 'low', 'medium', 'high', or 'critical'"
    )
    summary: str = Field(
        description="One-sentence summary of the customer's issue"
    )
    customer_sentiment: str = Field(
        description="Customer's emotional tone: 'frustrated', 'neutral', or 'satisfied'"
    )

형식 선택

동적 응답 형식 선택은 사용자 선호도, 대화 단계 또는 역할에 따라 스키마를 조정합니다—초기에는 간단한 형식을 반환하고 복잡성이 증가함에 따라 상세한 형식을 반환합니다.
  • State
  • Store
  • Runtime Context
대화 state에 따라 구조화된 출력 구성:
from langchain.agents import create_agent
from langchain.agents.middleware import wrap_model_call, ModelRequest, ModelResponse
from pydantic import BaseModel, Field
from typing import Callable

class SimpleResponse(BaseModel):
    """Simple response for early conversation."""
    answer: str = Field(description="A brief answer")

class DetailedResponse(BaseModel):
    """Detailed response for established conversation."""
    answer: str = Field(description="A detailed answer")
    reasoning: str = Field(description="Explanation of reasoning")
    confidence: float = Field(description="Confidence score 0-1")

@wrap_model_call
def state_based_output(
    request: ModelRequest,
    handler: Callable[[ModelRequest], ModelResponse]
) -> ModelResponse:
    """Select output format based on State."""
    # request.messages is a shortcut for request.state["messages"]
    message_count = len(request.messages)  

    if message_count < 3:
        # Early conversation - use simple format
        request = request.override(response_format=SimpleResponse)  
    else:
        # Established conversation - use detailed format
        request = request.override(response_format=DetailedResponse)  

    return handler(request)

agent = create_agent(
    model="openai:gpt-4o",
    tools=[...],
    middleware=[state_based_output]
)

Tool Context

Tool은 context를 읽고 쓰는 점에서 특별합니다. 가장 기본적인 경우, tool이 실행될 때 LLM의 요청 매개변수를 받고 tool 메시지를 반환합니다. Tool은 작업을 수행하고 결과를 생성합니다. Tool은 또한 model이 작업을 수행하고 완료할 수 있도록 하는 중요한 정보를 가져올 수 있습니다.

읽기

대부분의 실제 tool은 LLM의 매개변수 이상이 필요합니다. 데이터베이스 쿼리를 위한 사용자 ID, 외부 서비스를 위한 API key 또는 결정을 내리기 위한 현재 세션 state가 필요합니다. Tool은 이 정보에 액세스하기 위해 state, store 및 runtime context에서 읽습니다.
  • State
  • Store
  • Runtime Context
현재 세션 정보를 확인하기 위해 State에서 읽기:
from langchain.tools import tool, ToolRuntime
from langchain.agents import create_agent

@tool
def check_authentication(
    runtime: ToolRuntime
) -> str:
    """Check if user is authenticated."""
    # Read from State: check current auth status
    current_state = runtime.state
    is_authenticated = current_state.get("authenticated", False)

    if is_authenticated:
        return "User is authenticated"
    else:
        return "User is not authenticated"

agent = create_agent(
    model="openai:gpt-4o",
    tools=[check_authentication]
)

쓰기

Tool 결과는 agent가 주어진 작업을 완료하는 데 도움이 될 수 있습니다. Tool은 결과를 model에 직접 반환하고 agent의 메모리를 업데이트하여 향후 단계에서 중요한 context를 사용할 수 있도록 할 수 있습니다.
  • State
  • Store
Command를 사용하여 세션별 정보를 추적하기 위해 State에 쓰기:
from langchain.tools import tool, ToolRuntime
from langchain.agents import create_agent
from langgraph.types import Command

@tool
def authenticate_user(
    password: str,
    runtime: ToolRuntime
) -> Command:
    """Authenticate user and update State."""
    # Perform authentication (simplified)
    if password == "correct":
        # Write to State: mark as authenticated using Command
        return Command(
            update={"authenticated": True},
        )
    else:
        return Command(update={"authenticated": False})

agent = create_agent(
    model="openai:gpt-4o",
    tools=[authenticate_user]
)
Tool에서 state, store 및 runtime context에 액세스하는 포괄적인 예제는 Tools를 참조하세요.

Life-cycle Context

핵심 agent 단계 사이에 발생하는 것을 제어합니다 - 요약, guardrail 및 로깅과 같은 교차 관심사를 구현하기 위해 데이터 흐름을 가로챕니다. Model ContextTool Context에서 보았듯이, middleware는 context engineering을 실용적으로 만드는 메커니즘입니다. Middleware를 사용하면 agent 생명주기의 모든 단계에 연결하여 다음 중 하나를 수행할 수 있습니다:
  1. Context 업데이트 - 변경 사항을 지속하고, 대화 기록을 업데이트하거나, 인사이트를 저장하기 위해 state 및 store를 수정합니다
  2. 생명주기에서 이동 - context에 따라 agent 주기의 다른 단계로 이동합니다(예: 조건이 충족되면 tool 실행을 건너뛰고, 수정된 context로 model call을 반복)
Middleware hooks in the agent loop

예제: 요약

가장 일반적인 life-cycle 패턴 중 하나는 대화 기록이 너무 길어질 때 자동으로 압축하는 것입니다. Model Context에 표시된 transient 메시지 트리밍과 달리, 요약은 state를 영구적으로 업데이트합니다 - 이전 메시지를 향후 모든 턴에 대해 저장되는 요약으로 영구적으로 대체합니다. LangChain은 이를 위한 내장 middleware를 제공합니다:
from langchain.agents import create_agent
from langchain.agents.middleware import SummarizationMiddleware

agent = create_agent(
    model="openai:gpt-4o",
    tools=[...],
    middleware=[
        SummarizationMiddleware(
            model="openai:gpt-4o-mini",
            max_tokens_before_summary=4000,  # Trigger summarization at 4000 tokens
            messages_to_keep=20,  # Keep last 20 messages after summary
        ),
    ],
)
대화가 토큰 제한을 초과하면 SummarizationMiddleware가 자동으로:
  1. 별도의 LLM 호출을 사용하여 이전 메시지를 요약합니다
  2. State에서 요약 메시지로 대체합니다(영구적으로)
  3. Context를 위해 최근 메시지를 그대로 유지합니다
요약된 대화 기록은 영구적으로 업데이트됩니다 - 향후 턴에서는 원본 메시지 대신 요약을 볼 수 있습니다.
내장 middleware의 전체 목록, 사용 가능한 hook 및 사용자 정의 middleware를 만드는 방법은 Middleware 문서를 참조하세요.

모범 사례

  1. 간단하게 시작 - 정적 prompt와 tool로 시작하고, 필요할 때만 동적 기능을 추가하세요
  2. 점진적으로 테스트 - 한 번에 하나의 context engineering 기능을 추가하세요
  3. 성능 모니터링 - Model call, 토큰 사용량 및 지연 시간을 추적하세요
  4. 내장 middleware 사용 - SummarizationMiddleware, LLMToolSelectorMiddleware 등을 활용하세요
  5. Context 전략 문서화 - 어떤 context가 전달되고 있는지, 그 이유를 명확히 하세요
  6. Transient vs persistent 이해: Model context 변경은 transient(호출당)이며, life-cycle context 변경은 state에 지속됩니다

관련 리소스


Connect these docs programmatically to Claude, VSCode, and more via MCP for real-time answers.
I